🥕 Vegetables
How to Grow Potatoes in Bags and Beds
Grow your own potatoes in the UK — chitting, planting, earthing up, blight and harvesting first earlies and maincrop, in the ground or in containers.
Some links on this page are affiliate links. If you buy through them we may earn a small commission, at no extra cost to you. We only recommend things we think are genuinely useful for home growers.
The short version
- Buy certified seed potatoes — never plant supermarket spuds.
- Chit earlies from late January; plant out March–April once hard frosts ease.
- Plant 12–15cm deep, 30–40cm apart, then earth up as the shoots grow.
- Lift first earlies at flowering; wait for maincrop foliage to die back.
- Watch for blight in warm, wet weather — cut off and bin affected tops fast.
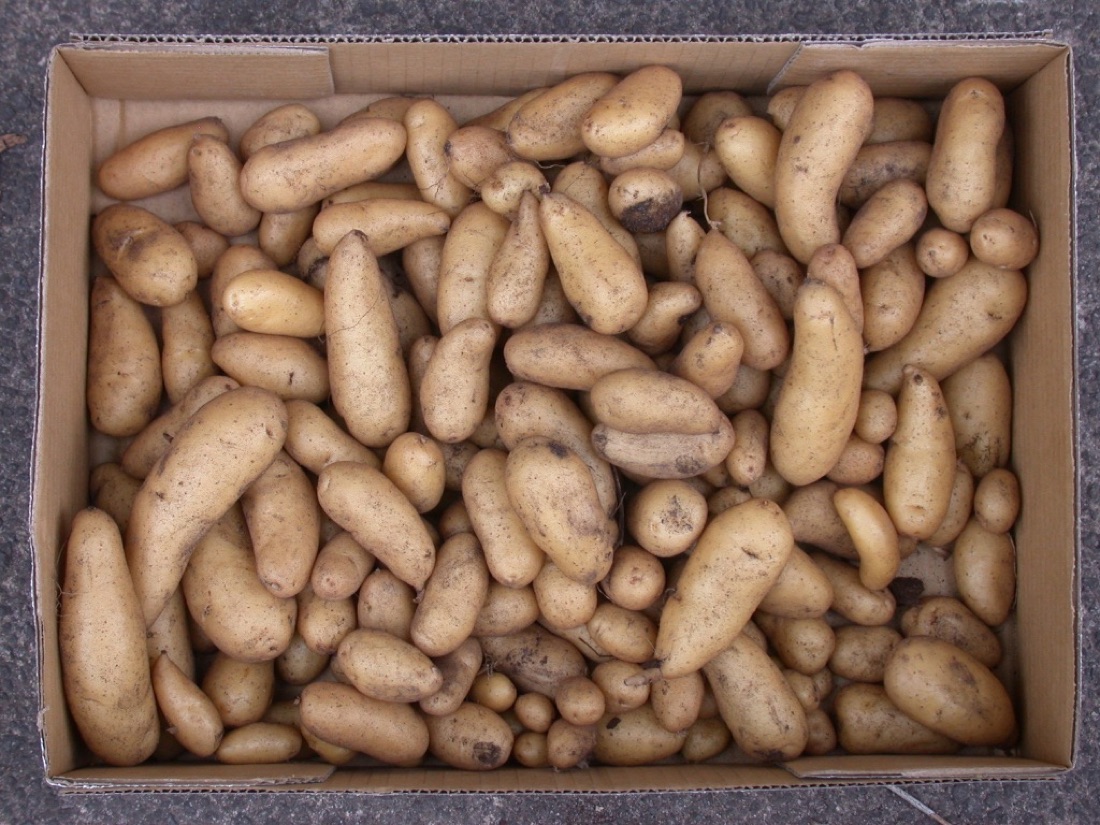
There is no crop more rewarding for a first-time grower than potatoes. You bury a single sprouted tuber in spring, do very little for a few months, and in summer tip out a bucket of clean new potatoes that taste sweeter than anything from a shop. Children find it pure magic — the digging is a treasure hunt — which is why potatoes are one of the easiest crops for kids to grow. They are also brilliant for breaking in rough ground, as the earthing up and dense leaf canopy smother weeds through the season.
If you have never grown anything before, start here. Potatoes are forgiving, they crop heavily even when you make mistakes, and they grow happily in the ground, in a raised bed, or in a bag on a balcony. The only real villain in the story is blight, and even that is manageable once you know what to look for. This guide walks you through the whole journey — choosing and chitting seed potatoes, planting, earthing up, watering, dodging the common problems, and lifting and storing a crop that can feed you well into winter.
Quick UK timing
Chit from late January. Plant first earlies mid-March, second earlies early April, maincrop mid-to-late April. Harvest earlies from June, maincrop August–September. Protect early shoots from late frosts with fleece or by earthing up.
Certified seed potatoes — and where to buy them
The potatoes you plant are called seed potatoes, though they are not seeds at all — each one is a small tuber that grows into a whole new plant. The single most important rule of potato growing is this: always buy certified seed potatoes. These are grown under inspection (much of the UK's seed crop comes from Scotland) and certified free of the viruses and diseases that build up in ordinary potatoes.
It is tempting to plant the sprouting potatoes from the back of your cupboard, but resist it. Supermarket potatoes are often sprout-suppressed with chemicals, may carry blight or virus, and crop unreliably. Certified seed costs a few pounds for enough to fill a bed, and gives you a clean, healthy start.
Seed potatoes are sold loose in garden centres from January, or in pre-packed nets online. Buy from Suttons, Thompson & Morgan, Dobies or Crocus. A 1kg net gives you 10–15 tubers, plenty for a row or a few bags.
Ready to grow potato?
We recommend the Charlotte (second early) variety to start with. Grab a packet and get sowing.
First early, second early and maincrop explained
Seed potatoes are sold in three groups, and the difference is simply how long they take to crop. Understanding it is the key to planning your potato year.
First earlies are the fastest — about 10–12 weeks from planting to harvest. Planted in mid-March, they give you new potatoes in June and July, well before blight season gets going. 'Rocket', 'Foremost' and 'Pentland Javelin' are reliable. These are the waxy little new potatoes you steam and toss in butter, and because they crop early they almost always escape blight.
Second earlies follow a couple of weeks behind, ready 13–15 weeks after planting, so July into August. 'Charlotte', 'Kestrel' and 'Nadine' are popular. 'Charlotte' is a brilliant all-rounder — a firm, waxy salad potato almost everyone enjoys, and a sensible choice for your first ever crop.
Maincrop potatoes are the big-yielding storers, taking up to 20 weeks. Planted in April, they are lifted in late August and September and stored for winter. 'Maris Piper', 'King Edward', 'Desiree' and 'Cara' are the classic floury bakers and roasters. They occupy the ground longest and are most exposed to blight, but a single row can fill a sack for the dark months.
If space is tight, grow earlies — quicker, tastier as new potatoes, and far less likely to meet blight. If you want a winter store and have room, add a row of maincrop. The yield calculator helps you work out how many tubers you need, and the savings calculator shows how much a row of potatoes can knock off the food bill.
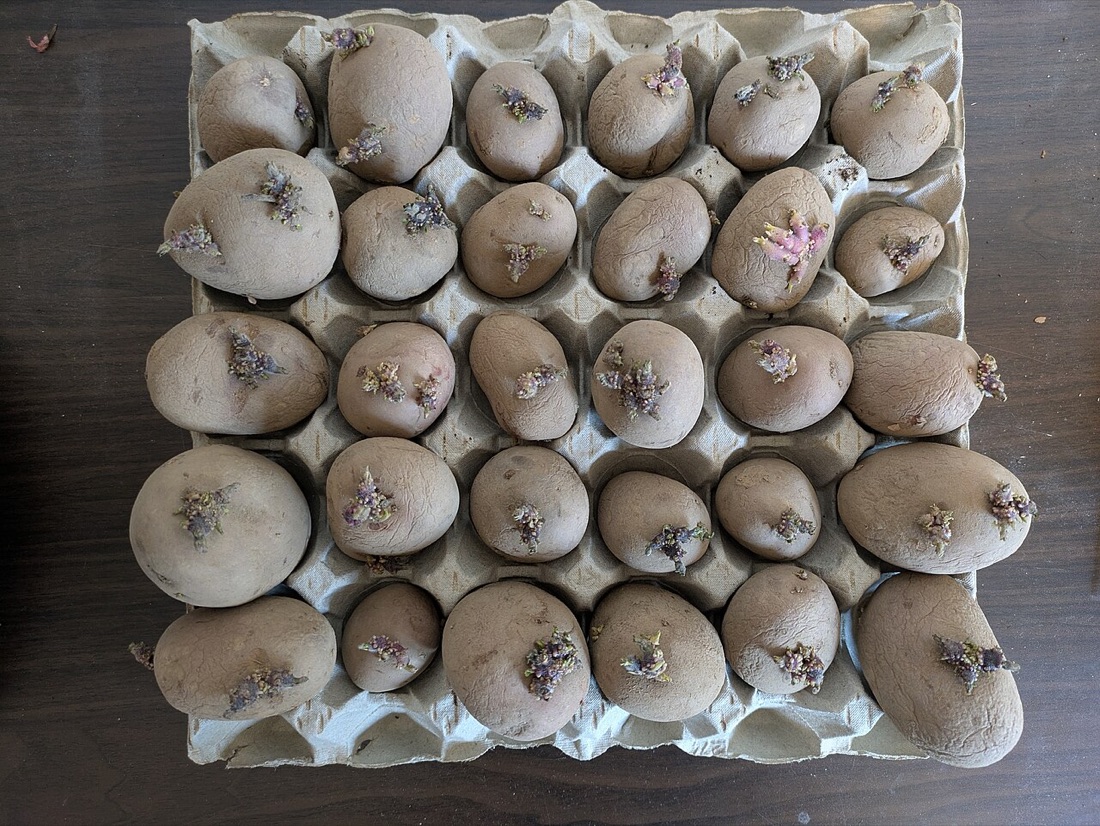
Chitting — giving earlies a head start
Chitting simply means sprouting your seed potatoes indoors before they go in the ground. It is not strictly essential, but it gives first and second earlies a real head start and can bring your first new potatoes forward by a couple of weeks.
From late January or early February, stand the seed potatoes in egg boxes or a shallow tray, with the end that has the most "eyes" (small dimples) facing upwards — the eyes are where shoots emerge. Put them somewhere cool, bright and frost-free, such as a windowsill in an unheated room, a porch or a light shed. Avoid anywhere warm and dark, which produces long, pale, weak shoots.
Over four to six weeks each tuber grows short, sturdy, green-purple shoots about 2cm long. Those stubby shoots are exactly what you want — a chitted tuber gets away faster. There is no need to chit maincrop if you are short of space, though it does no harm. For the full method, including how many shoots to keep, see our guide to chitting potatoes.
Rub off the weakest shoots
If a tuber grows lots of shoots, rub off all but the three or four strongest before planting. Fewer shoots means fewer but larger potatoes — a good trade for the main crop. Leave more shoots on if you want lots of small new potatoes.
Planting — in the ground, in beds or in bags
Potatoes are not fussy, but they like an open, sunny spot and reasonably fertile soil. Improve poor ground the autumn or winter before by digging in well-rotted compost or manure — our guide to improving your soil covers how. Wait to plant until the worst frosts have passed: mid-March for first earlies in milder areas, April further north. The planting calendar gives the right window for your part of the country.
Planting in the ground or a bed. Dig a trench about 12–15cm deep, or make individual holes. Set the seed potatoes in with their shoots pointing upwards, then cover with soil. Spacing matters:
- First and second earlies: 30cm apart, in rows 60cm apart.
- Maincrop: 37–40cm apart, in rows 75cm apart — they need more room to bulk up.
Draw the soil back over to fill the trench, leaving a slight ridge. A scattering of general-purpose fertiliser along the trench helps on poorer ground, but rich, composted soil rarely needs it.
Planting in bags or containers. This is perfect for patios, balconies and tiny gardens, and keeps the crop clean and easy to harvest. Use a potato grow bag, a large tub, or a builder's bucket with drainage holes — anything around 40 litres or more — and plant two or three seed potatoes per bag. The full method is in the container section below, and growing food in containers covers patio growing more broadly.
Earthing up — the step that makes or breaks the crop
Earthing up is the one job that genuinely matters, and beginners who skip it are often disappointed. As the green shoots push through, you draw soil up around them with a hoe or rake to form a ridge, leaving just the tips poking out. Repeat two or three times over a few weeks until you have a ridge 20–30cm high.
It does three jobs. First, it protects tender shoots from late spring frosts, which can scorch foliage black overnight. Second, it gives the plant a deeper, looser bank of soil in which to form more tubers, raising your yield. Third — and most importantly — it keeps light off the developing potatoes.
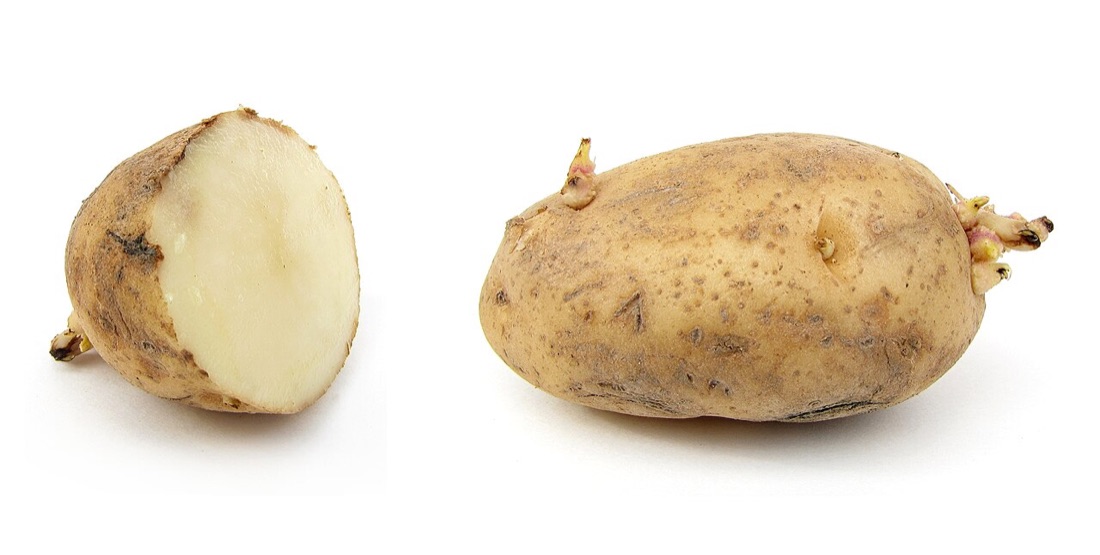
Light turns potatoes green and toxic
Any tuber exposed to light turns green and produces solanine, a natural toxin that makes potatoes bitter and unsafe to eat. Earthing up keeps them buried in the dark. Always cover any potatoes that work their way to the surface.
Start earthing up when the shoots are about 20cm tall, on a day when the soil is workable rather than sodden. In bags and containers you do the same thing by adding more compost. For the technique in full, see our guide to earthing up potatoes — it also explains how this prevents potatoes turning green.
Watering and feeding
Potatoes are thirsty plants, and watering separates a modest crop from a heavy one. The critical period is once the plants come into flower — that is when the tubers are bulking up underground, and a good soaking every week or two in dry weather pays off handsomely.
Aim for deep, less-frequent watering rather than a daily sprinkle: you want moisture down where the roots are. Erratic watering — dry spells broken by sudden floods — can cause tubers to crack or grow knobbly. Container-grown potatoes need far more attention, as bags can dry out within a day in summer, so check them daily and water until it runs from the base.
Potatoes in well-composted ground rarely need feeding. If your soil is poor, a high-potash liquid feed (the sort sold for tomatoes) every couple of weeks once flowering begins will help. Avoid heavy nitrogen feeds, which push leafy growth at the expense of potatoes.
The no-dig option
If you would rather not dig trenches, potatoes lend themselves beautifully to a no-dig approach, and are a classic crop for clearing a weedy bed without turning a sod. Instead of burying the tubers, lay them on the soil surface (or on cardboard over rough ground) and cover with a thick 15cm blanket of compost, well-rotted manure or loose straw.
As the shoots grow you "earth up" by piling on more compost or straw rather than soil. The potatoes form in this loose, dark mulch, so harvesting is almost effortless — peel back the covering and pick them out by hand. The mulch smothers weeds and feeds the soil for next year. It uses a lot of compost, so it suits smaller patches, but for a low-effort crop on awkward ground it is hard to beat.
Potato blight — spotting and managing it
Blight (Phytophthora infestans) is the disease behind the Irish potato famine, and the one thing every grower learns to watch for. It thrives in warm, humid, wet weather — the muggy spells of mid and late summer — and can flatten a healthy crop within a week or two.
The first signs are dark brown or black patches on the leaves, often starting at the tips or edges, sometimes with a pale yellow halo and a faint white fuzz of spores underneath in damp conditions. The patches spread fast, the stems blacken, and the plant collapses with a distinctive rotting smell. If the spores wash into the soil they can infect the tubers too, leaving reddish-brown rot inside.
There is no cure once a plant is infected, so the strategy is damage limitation:
- Grow earlies. First and second earlies are usually harvested before blight peaks, which is why they so often escape it.
- Cut and bin the tops fast. The moment you see blight, cut all the foliage off at ground level and bin it (not the compost) to stop spores reaching the tubers.
- Leave the tubers two weeks in the ground after removing the tops so surface spores die off, then lift them — blighted crops keep less well, so eat them first.
- Rotate and tidy. Never leave old tubers in the ground over winter, as they harbour the disease.
For early-warning "Blight Watch" alerts and resistant varieties like 'Sarpo Mira', see our guide to potato blight.
Harvesting — earlies at flowering, maincrop when foliage dies back
Knowing when to dig is half the fun. The two types are harvested quite differently.
First and second earlies are ready when the plants come into flower, usually from June. There is no need to wait for the foliage to die — scrape away the soil at the edge of a plant and feel for tubers the size of a hen's egg. Lift a whole plant with a fork from the side so you don't spear the crop, and eat earlies fresh: they don't store, and taste best within days of lifting.
Maincrop potatoes are left far longer. Wait until the foliage yellows and dies back in late August or September. About two weeks before lifting, cut the dead tops off at ground level and leave the tubers in the soil — this firms their skins so they store well. Then choose a dry day and dig carefully with a fork, lifting from well outside the ridge to avoid stabbing the potatoes.
A single first-early plant might give 0.5–1kg; a good maincrop plant can yield 1.5kg or more. Use the yield calculator to plan how many plants will feed your household.
Curing and storing
Only maincrop potatoes are worth storing — earlies are for eating fresh. After lifting on a dry day, leave the tubers on the surface for a couple of hours, then cure them: spread in a single layer somewhere cool, dark and airy for a week or two so the skins toughen. Don't wash them — dry soil brushed off later protects them better than damp-cleaned skin.
Sort carefully before storing. Set aside any that are damaged, speared, or showing rot and eat those first — a single bad potato spreads through a sack. Store the sound, dry tubers in paper or hessian sacks, never plastic, which traps moisture and rots them. Keep the sacks somewhere cool, dark and frost-free — a shed, garage or cupboard at around 4–10°C. Darkness is essential, or they sprout and green up. Checked occasionally, good maincrop potatoes keep right through to early spring.
Crop rotation
Potatoes should never grow in the same patch of ground two years running. Rotating crops stops soil-borne diseases like blight, scab and eelworm from building up, and spreads the demand on nutrients. The simplest plan is a three- or four-year rotation: follow your potatoes with legumes (peas and beans), then brassicas (cabbages, kale), then roots (carrots, beetroot), before potatoes return to that bed.
The key point is simply this: keep a record of where they grew, and don't bring them back to the same bed for at least three years. Even in a few beds, shuffling crops around each season makes a real difference to plant health.
Common problems
Blight — brown patches spreading across the leaves in warm, wet weather. Cut off and bin the tops at once, as covered above and in our potato blight guide.
Scab — rough, corky brown patches on the skin. It is only skin-deep and the potatoes are fine to eat once peeled, but it looks unsightly. Scab is worse on dry, alkaline, freshly limed soils, so water well in dry spells and add organic matter. See potato scab for prevention.
Greening — green patches mean light reached the tubers. The green flesh is mildly toxic and should be cut away or discarded. The cure is diligent earthing up. More in potatoes turning green.
Slugs — they tunnel into tubers, especially maincrop left long in wet ground. Lift on time, avoid leaving tubers in cold, soggy soil, and try slug-resistant varieties like 'Charlotte' or 'Kestrel' if it's a recurring problem.
Growing potatoes in containers — the detail
Container growing is how most patio and balcony growers succeed with potatoes. Choose a bag or pot of at least 40 litres with good drainage. Sit two or three chitted seed potatoes (earlies are best) on 10–15cm of peat-free compost and cover with 10cm more.
As the shoots grow, keep adding compost a few centimetres at a time, always leaving the tips showing — this is earthing up by another name, giving a deep column in which to form tubers. Stop topping up about 5cm below the rim. After that, water generously and daily in warm weather, and feed with a high-potash liquid feed every couple of weeks once flowering starts.
The joy of bags is the harvest: when the foliage flowers (earlies) or dies back (later types), tip the whole bag onto a sheet and pick out a clean crop with no digging and no slug damage. Our potatoes in containers guide goes deeper still.
A simple potato growing calendar
January–February — buy certified seed potatoes and start chitting earlies on a cool, light windowsill. Prepare the ground by digging in compost.
March — plant first earlies from mid-month once hard frosts ease. Use the planting calendar to check timing for your area, and keep fleece handy for cold nights.
April — plant second earlies early in the month, maincrop from mid-to-late April. Begin earthing up emerging shoots and fleece them if frost threatens.
May — earth up regularly as the haulms grow, water in dry spells, and cover tender growth if late frost threatens.
June — first earlies flower and are ready to lift. Keep earthing up and watering maincrop, and start watching for blight in warm, wet weather.
July — harvest second earlies as they flower. Water well, especially in bags, and cut off any blighted foliage at once.
August — maincrop foliage begins to yellow. Continue blight watch and lift any remaining earlies.
September — once maincrop tops die back, cut them off, wait two weeks, then lift on a dry day and cure for storing.
October onwards — store cured maincrop in paper sacks somewhere cool, dark and frost-free. Plan next year's rotation so potatoes move to a fresh bed.
What to grow alongside potatoes
Potatoes earn their keep as a "first crop" on new ground, clearing weeds and breaking up the soil for whatever follows. In a rotation, plant legumes — peas and beans — in the bed after your potatoes; they fix nitrogen and leave the ground in good heart, with brassicas like cabbage and kale doing well the year after.
If you are just setting up your growing space, our guide to improving your soil shows how to turn rough ground into a fertile bed. For patios, pair your potato bags with other easy crops in our growing food in containers guide. And because potatoes are such a thrill to dig up, they make a perfect project for young gardeners — see easy crops for kids for more ideas.
Key terms in this guide
- Chitting
- — Letting seed potatoes sprout short, sturdy green shoots before planting, to give them a head start and an earlier crop.
- Earthing up
- — Drawing soil up around the stems of a crop — most often potatoes — to protect shoots from frost, stop tubers greening, and encourage more to form.
- Blight
- — A fast-spreading disease (Phytophthora infestans) that rots the leaves, stems and fruit of potatoes and tomatoes in warm, wet weather.
- Crop rotation
- — Growing related crops in a different part of the plot each year to reduce the build-up of pests and diseases and balance soil use.
- Maincrop
- — A slower-maturing variety grown for a main, storable harvest, as opposed to quick early types; used especially for potatoes and carrots.
- First early
- — A fast-maturing potato (or other) variety ready to harvest early in the season, before second earlies and maincrop types.
Useful tools for this
Frequently asked questions
When do I plant potatoes in the UK?
Can I grow potatoes in a bag?
Do I need certified seed potatoes, or can I plant supermarket ones?
What is earthing up and why do I need to do it?
How do I know when to harvest potatoes?
What is potato blight and how do I spot it?
Keep reading
Chitting Seed Potatoes: Why and How
How to chit seed potatoes in the UK — what chitting is, why it gives early potatoes a head start, and the simple egg-box method step by step.
Earthing Up Potatoes: When and How to Do It
How and when to earth up potatoes in the UK — why it matters, how to do it, and how it protects tubers from frost and stops them turning green.
How to Grow Potatoes in Bags and Containers
How to grow potatoes in bags and containers in the UK — the best varieties, compost, watering and harvest for a patio crop with no garden needed.