🧒 Kids
The Bean in a Jar Experiment
How to grow a bean in a jar with kids — watch a seed sprout roots and a shoot through the glass, a simple UK science project that shows how seeds grow.
Part of: Gardening with Children: Fun Projects to Get Kids Growing
Some links on this page are affiliate links. If you buy through them we may earn a small commission, at no extra cost to you. We only recommend things we think are genuinely useful for home growers.
The short version
- What you need — a large dried broad or runner bean, a clear glass jar, kitchen paper or cotton wool, water and a warm, bright windowsill.
- Set it up — pack damp paper round the jar, wedge the soaked bean against the glass halfway down, and add a couple of centimetres of water in the bottom.
- Soak first — an overnight soak softens the seed coat so the bean sprouts a few days faster.
- The key care step — check daily and keep the paper damp like a wrung-out sponge; letting it dry out is the most common reason a jar bean stops growing.
- Avoid the main pitfall — don't let the bean sit underwater, or it goes mouldy and rots; damp, not drowned.
- What to expect — a root in 3–5 days, a shoot soon after, and a little plant within two weeks ready to pot up into peat-free compost and grow on outdoors once frost has passed.
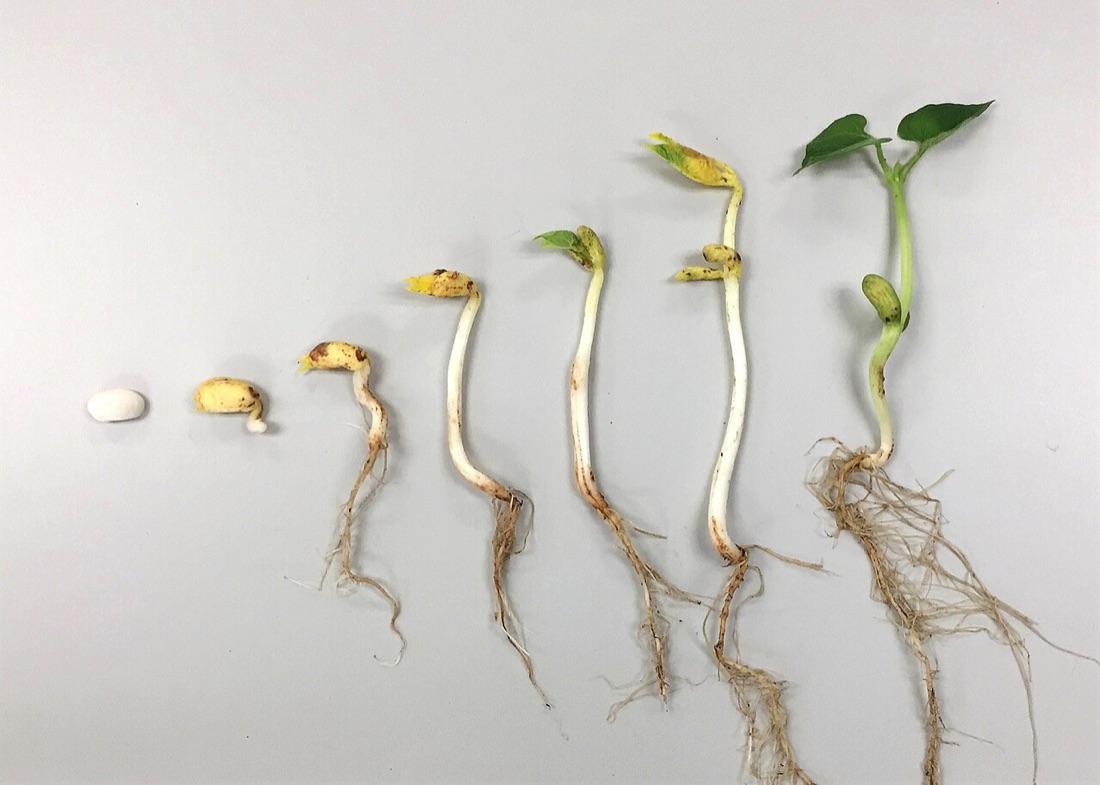
There is a special kind of magic in the bean in a jar experiment. With nothing more than a dried bean, a clean jar and a bit of damp kitchen paper, a child gets to peek at something that normally happens hidden in the dark under the soil. Over a week or two, they watch a wrinkled little seed swell, split, push out a pale root that curls downwards, and then send a green shoot reaching up towards the light — all of it visible through the glass.
It costs almost nothing, it works on a kitchen windowsill, and it turns "how do plants grow?" into something a child can see with their own eyes. This is one of the all-time classic projects in our getting kids growing guide, and it is a brilliant first step into the wider world of gardening with children. Here is exactly how to set it up, what to expect day by day, and the simple science behind it.
What you need
The lovely thing about this project is that you almost certainly have most of it in the house already.
- A dried bean. A large dried broad bean or runner bean is perfect, or a dried pea. Big beans are easier for small fingers to handle and you can see the action more clearly. Dried beans from a packet of seeds (or even the dried beans and peas from the cooking cupboard) work well.
- A clear glass jar or clear plastic cup. An old jam jar is ideal. You need to be able to see straight through it.
- Kitchen paper or cotton wool. Either will do — both hold water and let you wedge the bean against the glass.
- Water.
- A warm, light windowsill to stand it on.
A quick safety note
Use plain dried beans or seeds from a seed packet — never seeds that have been treated for sowing, as these are sometimes coated with chemicals and dyed pink or blue. This jar project is for watching, not for eating: the sprouts grown this way are not the same as the sprouting beans sold for salads, so pop the little plant into a pot afterwards rather than onto a plate. As always, supervise younger children with the glass jar.
A handy tip before you start: soak your bean in a cup of water overnight. Dried beans are rock hard, and an overnight soak softens the seed coat and wakes the bean up, so everything happens a few days faster. It is not essential, but with an impatient four-year-old in the house, it helps enormously.
Setting it up
This is a two-minute job that a child can do most of themselves.
- Line the jar. Scrunch up several sheets of kitchen paper (or a good handful of cotton wool) and pack them around the inside of the jar so they press against the glass all the way round. The paper needs to fit snugly — it is what holds the bean in place.
- Tuck the bean against the glass. Gently push the soaked bean down between the paper and the side of the jar, about halfway down, so it sits pressed against the glass where you can see it clearly. If you have a few beans and a wide jar, space several around the sides — it is fun to see whether they all behave the same way.
- Add a little water. Pour water into the bottom of the jar, just a couple of centimetres. The paper will soak it up and stay damp, a bit like a wick. You do not want the bean sitting underwater — it needs damp, not drowned. Too much water and the bean can go mouldy and rot.
- Find a warm, bright spot. A windowsill that gets some light is ideal. Beans like a bit of warmth to get going — somewhere around normal room temperature is perfect, which is why a kitchen or living-room windowsill beats a chilly porch.
Keep the paper damp
Check the jar every day or two and top up the water in the bottom so the kitchen paper never dries out. Letting it dry is the most common reason a jar bean stops growing. Equally, tip away any excess if it is sitting in a puddle. Damp like a wrung-out sponge is the sweet spot.
Now comes the best part for children — the waiting and the watching. Give them the job of being "bean monitor": checking the jar each morning, topping up the water, and maybe drawing what they see in a little notebook. A simple chart with a box for each day turns the whole thing into a proper science project.
What happens day by day
Every bean is a little different, but here is the rough timetable so you and your child know what to look out for. (These timings assume you soaked the bean overnight and the jar is somewhere warm.)
- Days 1–2: Not much to see on the outside, but the bean drinks up water and swells. It gets noticeably fatter and the wrinkly skin smooths out. Sometimes the seed coat splits.
- Days 3–5: The exciting moment — a small white root pokes out from the bean and begins to grow downwards. This is the start of germination, the moment a seed wakes up and begins to grow into a plant. The root may sprout fine, hair-like threads along its length, which help it grip and drink up water.
- Days 5–8: A shoot appears, usually a different shape to the root, and grows upwards. On a broad bean you may see it as a pale, curved stem.
- Days 8–14: The shoot grows taller and the very first leaves unfurl — often small and a fresh, bright green. By now you have a proper little plant with a root system below and leaves above, all of it on show through the glass.
The thing children love most is that the root always heads down and the shoot always heads up, no matter which way up you wedged the bean. Try turning the jar on its side for a day and watch the root and shoot slowly bend to set themselves right again. It looks like the plant knows which way is up — and in a way, it does.
The science, simply
So what is actually going on inside that jar? Here is how to explain it to a child without getting anything wrong.
A seed is a baby plant with a packed lunch. Inside every dried bean are two parts: a tiny plant in waiting, and a store of food packed around it (those two big halves of a bean are the food store). The hard outer skin is the seed coat, keeping it all safe while the seed waits.
To wake up, a seed needs water, warmth and air. A dry seed can sit asleep for a very long time. Give it water and a bit of warmth, and it wakes up and starts to grow — this waking-up and sprouting is called germination. Notice it does not need soil to begin, and it does not need light yet either. That is exactly why our jar trick works: the bean has everything it needs to start growing without ever being planted.
The root goes down to find water; the shoot goes up to find light. The first thing a seed grows is its root, which heads downwards to anchor the plant and drink up water. Then the shoot grows upwards, racing to reach the light so its leaves can start making food. Plants can sense the pull of gravity, which is how the root "knows" to go down and the shoot "knows" to go up — that is the trick you can prove by turning the jar on its side.
At first, the baby plant lives on its packed lunch. Until the first green leaves open, the little plant runs entirely on the food stored inside the bean. Once the leaves are out and catching the light, the plant starts making its own food, and the old bean shrivels up — its job is done.
If your child enjoys watching water and plants do clever things, the celery and food colouring experiment is the perfect follow-on. It shows the next part of the story — how a plant moves water all the way up from its roots to its leaves through tiny tubes inside the stem.
Potting it on to grow a real plant
Here is the part that turns a kitchen-table experiment into actual gardening: that little jar bean can become a real plant that grows real food. Once your bean has a good root and a shoot with its first proper leaves — usually after a couple of weeks — it is ready to be potted up.
- Fill a small pot with peat-free multipurpose compost and make a hole with your finger.
- Carefully lift the bean out of the jar, trying not to snap the delicate root, and lower it into the hole so the roots point down and the shoot points up.
- Gently firm the compost around it and water it in.
- Keep it on a bright windowsill, and once it is growing strongly and the weather is mild (late spring onwards in most of the UK), you can plant it outside.
Runner beans and broad beans are genuinely satisfying crops to grow on, and they are forgiving for beginners. For the full picture — when to sow, how to support them and when to pick — head over to our guide on how to grow beans. Beans also feature among our easiest crops for kids, because they germinate quickly and the seeds are big enough for small hands to plant.
UK timing for growing beans on
Started a jar bean in spring? Broad beans can go outdoors from around April, while tender runner beans and French beans should wait until all risk of frost has passed — late May or even June in colder parts of the UK. If your jar bean is ready before then, simply keep it growing in a pot somewhere bright and frost-free until it is safe to plant out.
Variations to try
Once you have done it once, there are lots of fun ways to take it further and turn it into a proper little experiment.
- Race different seeds. Set up several jars with different seeds — a broad bean, a runner bean, a pea, a sunflower seed — and see which sprouts first and which grows fastest. Children love a race, and it teaches that different seeds wake up at different speeds.
- Light versus dark. Stand one jar on a sunny windowsill and put an identical one in a dark cupboard. After a week, compare them. The seeds in the dark will often still germinate, because remember a seed does not need light to start — but the dark-grown shoots usually turn pale, weak and stretched, reaching desperately for light they cannot find. It is a vivid way to show why plants need the sun.
- Wet versus dry. Keep one jar nicely damp and leave another dry. The dry seed will not get going at all — proving that water is the key that unlocks the seed.
- Turn it upside down. As mentioned above, lay a sprouted jar on its side for a couple of days and watch the root and shoot bend to put themselves right again.
Each of these only changes one thing at a time, which is exactly how real scientists test ideas — a lovely, gentle introduction to the idea of a "fair test."
When you and your child have finished marvelling at the jar, do pot the best bean on to grow into a real plant, and explore more easy projects over on the gardening with children hub. From a single dried bean and an old jam jar, you have shown a child the very beginning of where their food comes from — and that is a wonderful thing to grow.
Key terms in this guide
- Germination
- — The moment a seed sprouts and begins to grow, triggered by the right mix of moisture, warmth and (for some seeds) light.
Frequently asked questions
Which beans work best in a jar?
How long does a bean take to sprout in a jar?
Keep reading
Gardening with Children: Fun Projects to Get Kids Growing
Fun, easy ways to get children gardening in the UK — quick-win crops, simple science experiments and projects that teach kids how plants really grow.
The Celery and Food Colouring Experiment
How to do the celery and food-colouring experiment with kids — watch celery drink coloured water and learn how plants take up water, step by step.
How to Grow Beans (Runner & French) at Home in the UK
Grow runner beans and French beans in the UK — sowing times, supports, watering, and getting a heavy crop from May to October in any UK garden or pot.