🌿 Herbs
How to Grow Chives at Home in the UK
Grow chives in the UK — an easy, hardy perennial herb with edible flowers, perfect for beds, pots and windowsills, with tips on dividing and harvesting.
Some links on this page are affiliate links. If you buy through them we may earn a small commission, at no extra cost to you. We only recommend things we think are genuinely useful for home growers.
The short version
- Sow or buy in spring — sow seed March to May, or buy a young plant for an instant clump; plant out April to June.
- Where to grow — full sun to light shade in any reasonable, moist but free-draining soil; happy in borders, pots (20–25cm) and on a windowsill.
- The key job is cutting — snip leaves down to 2–3cm above the base regularly for a cut-and-come-again crop from April to October.
- Eat the flowers — purple pompoms in May–June are edible and loved by bees; snip flower buds off if you want tender leaves instead.
- Divide every 2–3 years — lift and split congested clumps in early spring or autumn to keep them vigorous (one plant becomes four or five).
- Main pitfall — letting them dry out in a hot spell makes leaves pale and tough; water in droughts, especially pots. Otherwise nearly trouble-free.
If you only ever grow one herb, make it chives. They are about as close to effortless as growing your own food gets: plant once, and a tidy clump of hollow green spears returns every spring with almost no help from you. They cope with a bit of shade, shrug off cold winters, and throw out cheerful purple flowers that you can eat and that bees adore.
This guide covers everything a UK beginner needs — where to grow chives, whether to sow or buy a plant, how to keep them productive year after year, and the handful of things that can (rarely) go wrong.
Quick UK timing
Sow: March to May (indoors or outdoors once the soil warms). Plant out: April to June. Harvest: April to October, with a flush of edible flowers in May–June. Divide: every 2–3 years in early spring or autumn. Chives die back over winter and reappear in spring.
Why grow chives
Chives are the herb that gives back the most for the least effort, which makes them a brilliant first crop. They are a perennial — a plant that lives for several years rather than dying after one season — so unlike annual herbs such as basil or coriander, you plant chives once and they come back of their own accord every spring. A single small plant bought this April could still be feeding you in five years' time.
They are also genuinely hardy. Chives survive UK winters outdoors without protection, tolerate frost, and put up with the kind of cool, damp spring that sulks other herbs into a standstill. They will grow in a border, a pot, a window box or a windowsill, and they ask for very little beyond the occasional drink and a regular trim.
Chives are a member of the allium family — the same group as onions, garlic, leeks and spring onions — which is exactly where their flavour comes from. The slender hollow leaves have a mild, fresh oniony taste, gentler than a raw spring onion. Snip them raw over soups, omelettes, baked potatoes, salads and dips; they lose their flavour if cooked hard, so add them at the very end.
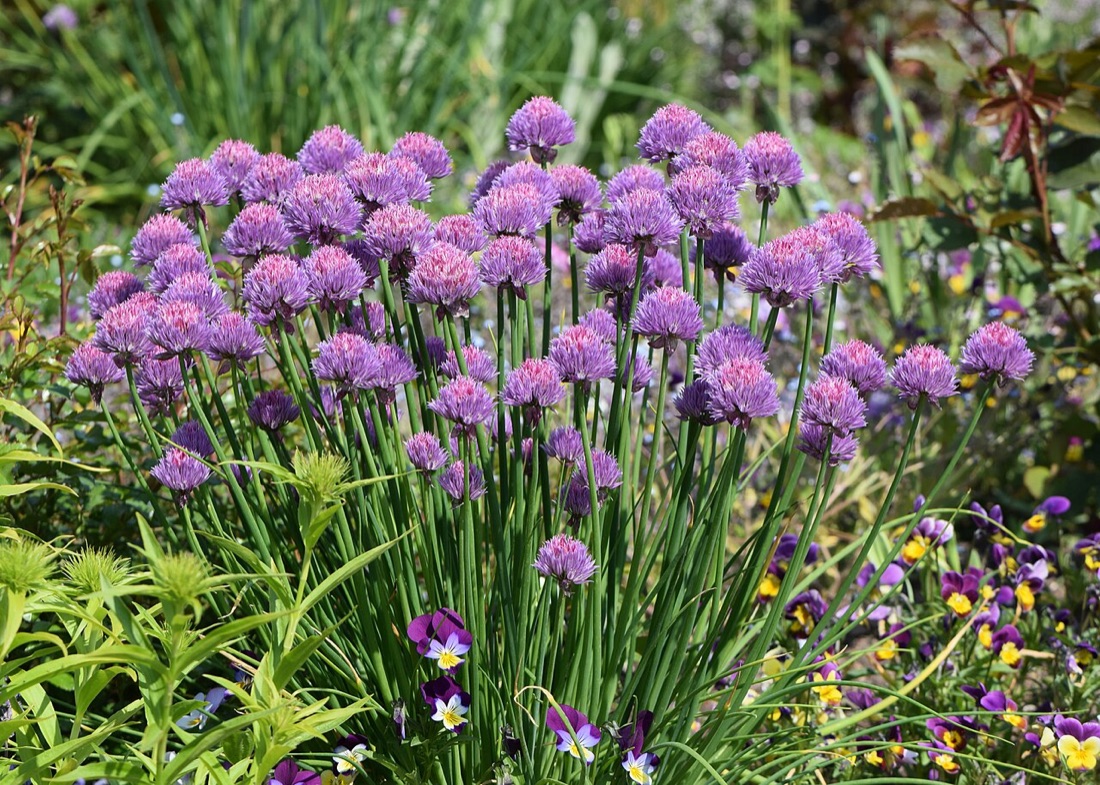
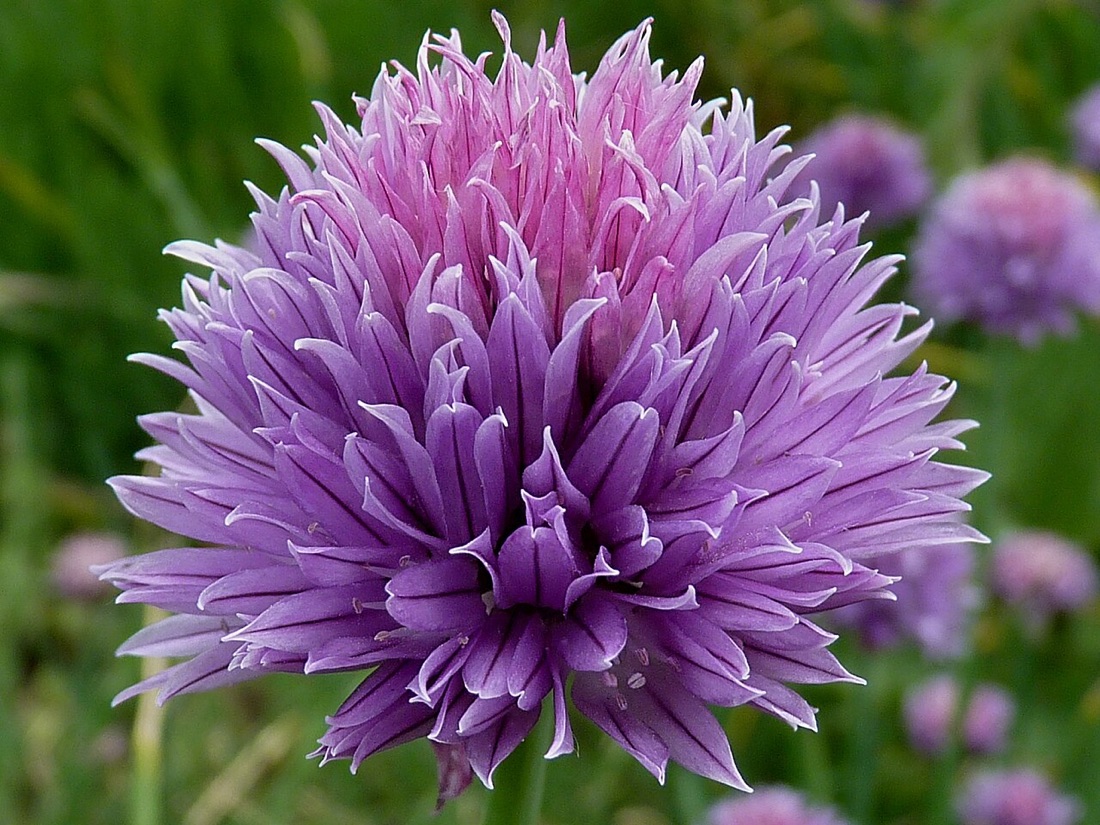
Then there are the flowers. In late spring the plant sends up round purple pompoms that are not only pretty but edible, with a stronger oniony kick than the leaves — wonderful pulled apart and scattered over a salad. Better still, those flowers are a magnet for bees and other pollinators, so a clump of chives quietly earns its keep in a wildlife-friendly garden as well as in the kitchen. For all these reasons chives sit near the top of any list of the easiest crops for beginners.
Where to grow chives
Chives are wonderfully unfussy about position. The ideal spot is full sun to light shade — they crop most generously in sun, but unlike sun-loving Mediterranean herbs such as rosemary and thyme, they will happily put up with a few hours of shade each day. That makes them one of the better herbs for a slightly gloomy plot or a north-east-facing windowsill.
For soil, almost anything reasonable will do. Chives prefer a moist but free-draining soil that does not bake bone-dry in summer or sit waterlogged in winter. If your ground is heavy and sticky, or thin and sandy, work in some garden compost before planting — a little time spent improving your soil pays off across the whole plot, not just for chives. They are not heavy feeders, so there is no need to enrich the ground heavily.
Growing chives in pots is just as easy, and arguably tidier. A pot of around 20–25cm across, filled with peat-free multipurpose compost, will keep a clump happy for a couple of years before it needs splitting. Pots dry out faster than open ground, so the main summer job is keeping the compost from drying out completely. The principles in our guide to growing food in containers apply here — good drainage holes, decent compost, and regular watering.
Chives are also one of the very best herbs for a kitchen windowsill. They are compact, neat and quick to recover after cutting, so a small pot by the sink can supply fresh snippings within arm's reach of the chopping board — see our guide to windowsill growing for getting the light and watering right indoors. A windowsill clump is also a brilliant, low-stakes way of getting kids growing: the snip-and-it-grows-back habit is hugely satisfying for a child.
Sowing or buying a plant
You have two routes into chives, and for most beginners I would gently steer you towards the easier one.
Buying a young plant is the simplest start by a mile. Chives are widely sold as small pots in garden centres and supermarkets from spring onwards, and a single plant gives you an instant, harvestable clump with no waiting and no germination worries. Plant it out into a border or a larger pot, water it in, and you are essentially done. Within a year or two that one plant will have bulked up enough to divide into several — so it is also the cheapest route in the long run.
Growing from seed is cheap and rewarding if you would like more than one clump. Sow chive seed from March to May. The neatest method is to sow indoors in modules or a small pot of seed compost: scatter a small pinch of seed thinly, cover with about 1cm of compost, water gently, and keep somewhere warm and light. Chives are slow to start, so be patient — germination can take two to three weeks. Once the grassy seedlings are a few centimetres tall and growing in a clump, harden them off and plant the whole clump out after the last frost, usually from late April in most of the UK.
You can also sow chives directly outdoors from late April into May, once the soil has warmed up. Direct sowing is more weather-dependent, so an indoor start gives more reliable results in a cold spring. Either way, you do not need to thin chives — they naturally grow as a dense tuft, and a clump of seedlings together makes a far better plant than a single lonely one.
Sow a little, not a lot
A pinch of chive seed goes a long way — one packet will keep you in plants for years. There is no need to sow the whole packet; a small clump of seedlings grows into a generous plant. Use our planting calendar to slot the sowing window into your year.
Caring for chives
The honest truth is that established chives need barely any care, which is exactly why they belong in every beginner's herb collection. A few simple habits, though, will keep your clump lush and productive rather than thin and tired.
Watering. Chives like a soil that stays slightly moist, so the main risk in a UK summer is letting them dry out completely during a hot, dry spell — drought makes the leaves go pale, tough and prone to flopping. Water them in prolonged dry weather, and keep a closer eye on plants in pots and on windowsills, which dry out far faster. They are not bog plants, though, so do not keep them sodden; aim for the soil of a wrung-out sponge.
Feeding. In open ground, chives rarely need feeding at all. Plants in pots appreciate a little help, as nutrients wash out of the compost over a season — a feed every few weeks, or a fresh top-dressing of home-made compost, keeps a potted clump green and vigorous.
Cutting. This is the one job that genuinely improves chives: cut them regularly. Trimming the leaves down to a few centimetres above the base encourages a flush of fresh, tender new growth and stops the clump becoming straggly. Even if you are not using them in the kitchen, giving the whole plant a haircut now and then keeps it productive — chives respond to cutting the way a lawn responds to mowing.
The flowers. From May into June your chives will try to flower. You have a pleasant choice here. Leave the flowers and you get those cheerful purple pompoms — beautiful, edible, and a brilliant nectar source. Bees, hoverflies and other beneficial insects love them, so leaving a few to flower is a small, easy thing you can do for pollinator-friendly planting and for attracting beneficial insects that help keep pests down across your plot.
The trade-off is that once a chive plant flowers, the leaves turn a little tougher and the plant puts its energy into setting seed. If you mainly want tender leaves for cooking, snip the flower buds off before they open. A happy middle path is to let some of the clump flower for the bees, and keep cutting the rest for the kitchen. After flowering, shear the whole plant back hard and it will quickly throw up a fresh crop of tender leaves.
Self-seeding
If you leave the flowers to fully set seed, chives will happily sprinkle seedlings around the garden — handy if you want more plants, mildly annoying if you don't. To keep them in check, cut the flower heads off once they fade rather than letting them ripen and scatter.
Dividing chives to keep them going
This is the one technique that turns chives from a nice plant into a plant you will never need to buy again. Over a few years a chive clump gradually grows into a dense, congested cushion. The centre can become woody and less productive, and the whole thing competes with itself for water and nutrients. The fix is simple: lift and divide it.
Every two to three years, in early spring as the new growth appears (or in autumn), dig up the whole clump, tease or chop it into several smaller sections each with a good cluster of roots and shoots, and replant them — one back where the original was, the rest into pots, elsewhere in the garden, or shared with a friend. Watered in well, each division quickly establishes into a vigorous new clump. It is the gardening equivalent of a free lunch: one plant becomes four or five, all rejuvenated and cropping better than the tired original.
Dividing is genuinely beginner-friendly — chives are tough and forgive rough handling — but if you would like a proper step-by-step, our guide to dividing chives walks through exactly when and how to do it without harming the plant.
Harvesting chives
Harvesting could not be simpler, and it is the bit that makes chives feel so generous. From spring, once a young plant has a decent number of leaves, you can start cutting.
Use scissors or snips rather than pulling, which can tug the whole plant out of the ground or loosen the roots. Cut the hollow leaves down to about 2–3cm above the base — taking them low like this, rather than just nipping the tips, encourages the plant to push up clean new growth from the bottom. Always leave the base intact and a portion of the clump uncut so the plant keeps photosynthesising and recovers quickly.
Chives are the classic cut-and-come-again herb: harvest a handful, and within a week or two fresh leaves have grown to replace them. You can keep this cycle going right through the season, from April to October, which means a single clump supplies far more than you might expect. Don't be shy about cutting — a chive plant that is harvested regularly stays younger, greener and more tender than one left to its own devices.
For the kitchen, snip chives fresh and add them at the end of cooking or raw, as heat quickly dulls their delicate flavour. They are at their best within a day or two of cutting; if you have a glut, the leaves freeze far better than they dry — chop them straight into ice-cube trays with a little water, as drying robs chives of most of their taste.
Garlic chives — a tasty alternative
Once you are hooked on ordinary chives, it is worth knowing about their close cousin, garlic chives (also sold as Chinese chives, Allium tuberosum). They are grown in exactly the same easy way — sun or light shade, undemanding soil, a hardy perennial that returns each year — but they bring something different to the plate.
The most obvious difference is the leaf: garlic chives have flat, strap-like leaves rather than the round, hollow ones of common chives, and the flavour leans towards mild garlic rather than onion. They also flower later, usually in late summer, with white star-shaped flowers (rather than purple pompoms) that are equally loved by bees. They are excellent in stir-fries, dumpling fillings and any dish where you want a gentle garlic note. Growing both gives you a longer flowering season for pollinators and two distinct flavours from two equally easy plants.
Overwintering chives
Chives look after their own winter survival, which is one more reason to love them. As the days shorten and the cold sets in, the leaves yellow and die back, and by midwinter the plant may have disappeared from view entirely. This is completely normal — the plant is not dead, simply dormant. Resist the urge to dig it up or replace it. Come spring, fresh green spears push up from the same roots as if nothing had happened.
There is no special protection needed for chives outdoors in the UK; they are fully hardy and a hard frost does them no harm. The one job worth doing is a quick autumn tidy — clear away the old yellowed leaves so the crown sits clean and ready, and so slugs have less to shelter in over winter.
If you would like fresh chives during the bleak months, you can force a pot indoors. In autumn, lift a small division of an established clump, pot it up, and leave it outside until it has had a spell of cold weather (chives crop better after a cold rest). Then bring the pot onto a bright, cool windowsill in late winter, and the warmth coaxes it into early growth, giving you tender leaves weeks ahead of the garden plants — the same trick that keeps a windowsill herb garden productive when the beds outside are bare.
Through the UK year
Spring: new growth appears; start cutting and divide congested clumps. Early summer: flowers open — leave some for the bees, snip the rest. Late summer: shear back after flowering for a fresh flush. Autumn: tidy old leaves; lift a division to force indoors if you like. Winter: the plant dies back and rests — leave it be.
Problems with chives
Here is the good news to end on: chives have very few problems. They are tough, pest- and disease-resistant, and for most growers the worst that ever happens is a clump getting a bit congested (cured by dividing) or a bit pale and floppy in a drought (cured by watering). Still, two issues are worth recognising on the rare occasions they appear.
Allium leaf miner and onion problems. Because chives are alliums, they can in theory be affected by the same pests as onions and leeks — allium leaf miner being the main one in some parts of the UK, leaving distorted leaves and small white maggots near the base. It is uncommon on chives, and a healthy, regularly cut clump usually shrugs it off. If you grow onions, leeks or garlic, simple allium good practice — not crowding plants and rotating where you grow them — keeps the whole family healthier.
Rust. In a wet season you may occasionally see rust: small orange or rusty-brown pustules on the leaves. It looks alarming but is rarely serious on chives. The cure is simple — cut the affected leaves down to the base and bin them (don't compost rusty material), and the plant grows clean new ones. Not over-crowding, and dividing congested clumps, makes rust far less likely in the first place.
That really is the extent of it: for most gardeners, chives are a plant-it-and-forget-it herb that asks for a snip and a drink and gives back fresh oniony leaves for years.
A couple of things worth having
You truly do not need much to grow chives — a plant or a pinch of seed and a pot or patch of ground is the whole shopping list. But once you have explained the few jobs that matter (cutting, dividing, the occasional drink), a couple of bits make them easier, and they cross over to every other herb you will grow.
If you would rather start from seed, chives are sold by all the main UK suppliers and a single packet lasts for years.
Ready to grow chives?
We recommend the Common Chives variety to start with. Grab a packet and get sowing.
Where to go next
Chives are the perfect gateway herb — easy enough to build your confidence, generous enough to keep you interested. Once you have a clump going, the natural next steps are to add a few more herbs and make the most of any sunny windowsill.
Start with our full guide to growing basil, the classic summer herb, then branch into the tougher, drought-loving Mediterranean herbs like rosemary and thyme. Whenever your chive clump starts to look crowded, head to our step-by-step on dividing chives and turn one plant into many. Browse the full herbs section for the rest, or the wider getting started guides if chives have given you the bug to grow more food.
Key terms in this guide
Useful tools for this
Frequently asked questions
Are chives easy to grow?
Can you eat chive flowers?
How do you keep chives productive?
Keep reading
How to Divide Chives for More Plants
How to divide chives in the UK — split a tired clump into several vigorous new plants for free, keeping your chives healthy and productive year after year.
How to Grow Food on a Windowsill
How to grow food on a windowsill in the UK — the best herbs, salads and microgreens for an indoor sill, plus light, watering and the right pots.
How to Grow Basil at Home in the UK
Beginner's guide to growing basil in the UK — sowing, warmth, light, the pinching trick, watering, harvesting and beating bolting for months of fresh leaves.