🌱 Getting Started
Gardening for Free: Reuse and Recycle in the Garden
How to garden for almost nothing in the UK — reuse household waste, make your own pots, feeds and compost, and cut the cost of growing your own food.
Some links on this page are affiliate links. If you buy through them we may earn a small commission, at no extra cost to you. We only recommend things we think are genuinely useful for home growers.
The short version
- Make your own compost — layer "greens" (peelings, grass) with "browns" (cardboard, leaves) for free soil food in six to twelve months; keep cooked food, meat, fish and dairy out to avoid rats.
- Raise seedlings in your recycling — loo-roll tubes for deep-rooted peas, beans and sweetcorn; punnets for salad leaves. Always add drainage holes and wash anything that held food.
- Grow in upcycled containers safely — buckets, bowls and crates all work, but never reuse anything that held chemicals, oils or paint; avoid old tyres for food and use only heat-treated (HT) pallets.
- Brew plant teas that actually work — comfrey ('Bocking 14') for fruiting crops, nettle for leafy growth; dilute roughly ten to one before use.
- The big myth — eggshells do not cure blossom end rot (the real fix is consistent watering) and won't stop slugs; compost them instead.
- Get plants for free — save seed from open-pollinated tomatoes, beans and peas, take cuttings, divide perennials, and use seed swaps.
Growing your own food has a reputation for being cheap, and it can be — but only if you do not let a garden centre talk you into a trolley full of compost, plastic pots, feed bottles and "essential" kit before you have grown a single bean. The truth is that a surprising amount of what a garden needs is already passing through your house as waste, or can be made for nothing.
This guide is the hub for thrifty growing on Farm Simple. It pulls together the whole approach — feeding your soil for free, making your own pots, growing in upcycled containers, brewing homemade feeds, and getting free plants — and points you to the detailed how-tos for each. Along the way it is honest about what actually works, because reusing-and-recycling advice is riddled with cheerful myths that quietly waste your time.
Why grow for (almost) free
There are three good reasons to garden thriftily, and they reinforce each other.
It saves real money. Multipurpose compost, plastic modules, grow bags, liquid feeds and a wall of branded "solutions" add up fast. A first-year plot can easily cost more than the veg it produces. Reusing materials you already have turns growing your own into the money-saver it is supposed to be.
It cuts waste. Kitchen peelings, cardboard, leaves, old containers and packaging are mostly things you would otherwise throw away. Sending them through the garden instead of the bin is good housekeeping and good for the wider environment.
It closes the loop, and that is genuinely satisfying. There is a quiet pleasure in feeding your soil with last autumn's leaves, raising seedlings in loo-roll tubes, and watering tomatoes with a feed you brewed from a weed. You stop buying inputs and start running a small, almost self-sufficient system. For a beginner that is also reassuring — fewer purchases means fewer decisions and less to get wrong.
A sensible mindset: before you buy anything, ask "do I already have something that does this job?" Nine times out of ten you do.
Thrifty, not cheap
Free does not mean shoddy. Homemade compost, leaf mould and saved seed are often better than what you would buy. The aim is to spend money only where it genuinely earns its keep — good secateurs, peat-free compost for fussy seedlings — and get everything else for nothing.
Compost and feed your soil for free
The single biggest saving in any garden is making your own compost. Bought multipurpose compost is one of the steady costs of growing, and a heap in the corner turns your peelings, prunings and cardboard into the same thing for free.
Composting is simply rotting down organic matter in a controlled way. You layer "greens" (nitrogen-rich, soft and wet — vegetable peelings, grass clippings, soft prunings, coffee grounds) with "browns" (carbon-rich, dry and woody — cardboard, dead leaves, straw, paper). Keep it roughly balanced, give it air, and in six to twelve months you have dark, crumbly, sweet-smelling compost to spread on your beds. Our full walkthrough on how to make compost covers bins, layering and how to speed things up, and the companion guide on what you can and cannot compost saves you the common beginner mistakes.
One of those mistakes matters for safety. A normal open compost heap or "dalek" bin must not take cooked food, meat, fish or dairy — these attract rats, foxes and flies and turn slimy rather than composting cleanly. If you want to recycle those, you need a bokashi system, a sealed hot bin, or your council's food-waste caddy instead.
Keep vermin out of the heap
Cooked food, meat, fish, dairy and oily leftovers do not belong in an ordinary compost heap — they bring in rats. Put those through bokashi, a hot composter, or council food recycling. Keep your open heap to raw peelings, garden waste, cardboard and paper.
If you have more leaves than your compost heap can handle each autumn, do not bin them — pile them up separately and let them rot slowly into leaf mould, a lovely soil improver and seed-compost ingredient that costs nothing but patience. And if you fancy turning kitchen scraps into a concentrated feed indoors or in a shed, a wormery does exactly that and produces both rich worm compost and a liquid feed.
Once you have compost, the cheapest and least back-breaking way to use it is the no-dig method: you spread a layer on top of the soil as a mulch and let the worms work it in, rather than digging. It suits thrifty gardeners perfectly because compost goes further as a surface layer, and it is gentler on the soil. Our no-dig gardening guide explains how to start, and the broader improving your soil article shows where all this organic matter is heading: a deep, living, fertile bed that needs fewer bought inputs every year.
Make your own pots and modules
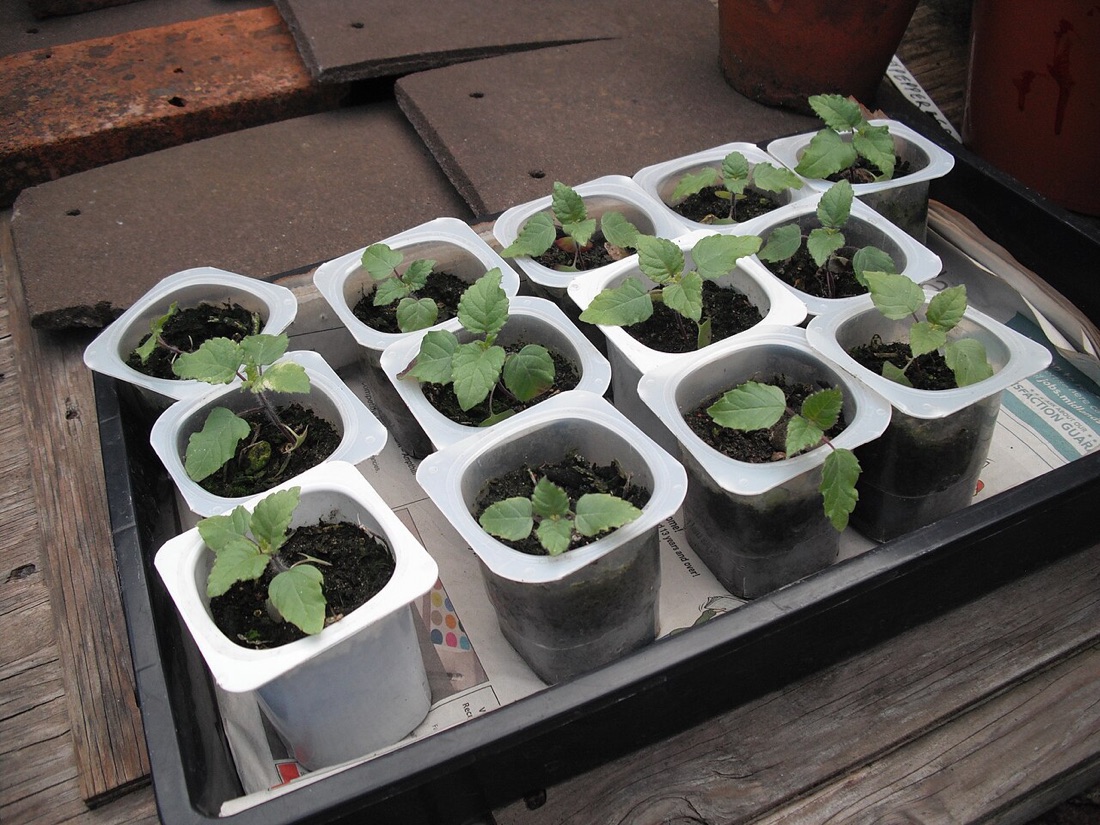
You do not need to buy a single seed tray or plastic module to raise seedlings. Your recycling bin is full of pots.
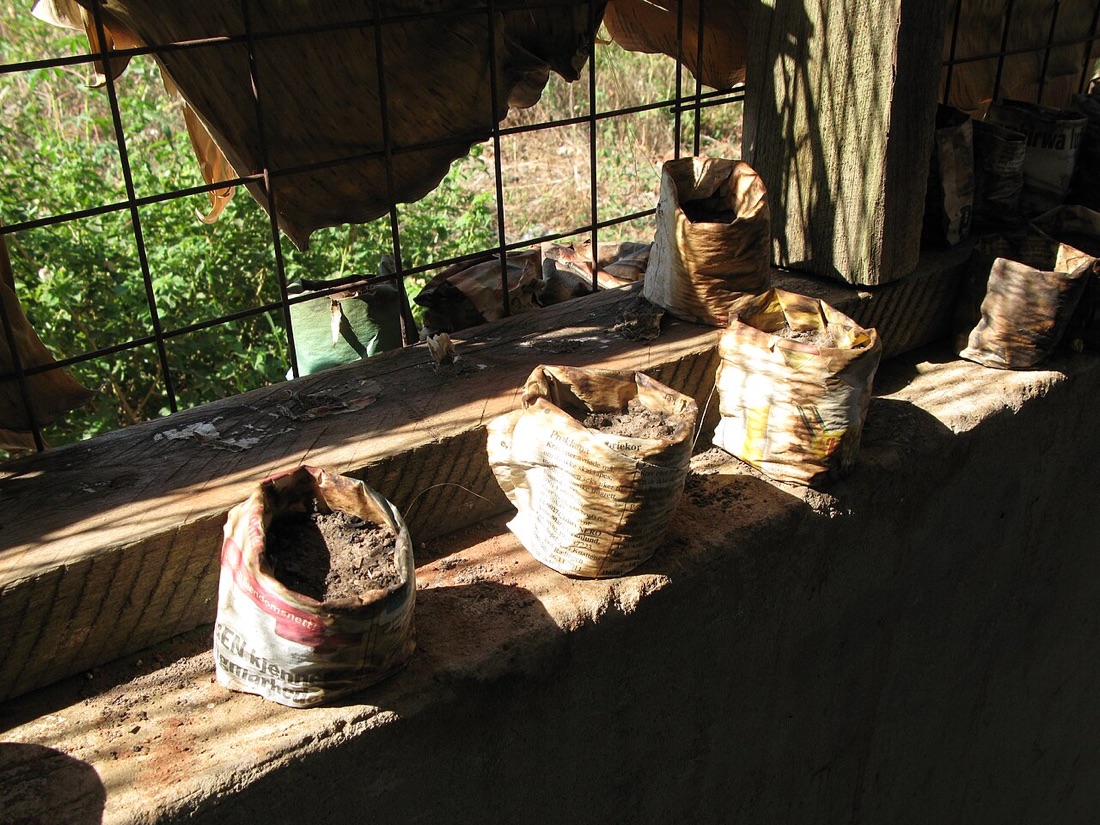
Toilet-roll and kitchen-roll tubes make excellent deep modules for plants with long roots — peas, beans, sweetcorn — and can be planted out whole because the cardboard rots away. These cheap, hands-on projects are also a brilliant way of getting kids growing, who love sowing into bottles and tubes. Newspaper rolled around a jar or a wooden mould makes biodegradable pots. Yoghurt pots, mushroom punnets, fruit trays, takeaway tubs and the bottoms of plastic bottles all become seed pots once you poke a few drainage holes in them. Clear plastic punnets with lids are ready-made mini propagators.
The full method — which household items work best for which crops, how to make paper pots, and which ones to plant out whole versus reuse — is in our DIY seed pots guide. A couple of things worth knowing up front: wash anything that held food so it does not go mouldy, and always add drainage holes, because waterlogged compost kills more seedlings than almost anything else.
Match the pot to the root
Shallow punnets are fine for lettuce and other quick salad leaves. Give long-rooted crops like beans and sweetcorn something deep — loo-roll tubes or a cut-down bottle — so the roots are not cramped and checked before you plant out.
For sowing, you can reuse the same compost-saving logic: a homemade seed compost from sieved garden compost mixed with leaf mould works for many crops, though very fine seed and fussy seedlings still appreciate a bought peat-free seed compost. If you are just starting out, see easiest crops for beginners for the forgiving plants to practise on first.
Grow in upcycled containers — with the safety checks
If you have no beds, or just want more growing space, almost any large container can grow food: old buckets, washing-up bowls, storage crates, tin baths, builders' bags, wooden wine crates, even a sturdy cardboard box lined with a bag for a single season. This is the cheapest possible route into growing food in containers, and it suits balconies, patios and yards.
The rules are the same as for any pot: enough depth and volume for the crop, drainage holes in the base, and good compost. A washing-up bowl is plenty for lettuce or a courgette; a builder's bag or several stacked buckets will take potatoes or a tomato plant.
But upcycled containers come with safety checks that bought pots do not, and these matter because you are growing food:
- Never reuse anything that held chemicals, fuel, oils, solvents or paint. Old pesticide drums, oil cans and paint tubs can leave residues that you do not want anywhere near edible crops, no matter how well you rinse them.
- Think twice about old tyres. Tyres are a popular free "planter", but there is a genuine, unresolved debate about whether they leach heavy metals and other compounds into the soil as they degrade. Plenty of growers avoid them for food crops on the precautionary principle, and that is the side we come down on. Use them for ornamentals if you like; keep them away from your veg.
- Only use heat-treated (HT) pallets and timber, never chemically-treated wood. Heat-treated pallets are stamped "HT" and are safe; older pallets treated with chemical preservatives (look for "MB", methyl bromide) are not, and treated timber can leach into soil. The same caution applies to old railway sleepers, which were often treated with creosote.
Our full upcycled containers guide goes through suitable containers crop by crop, how to add drainage and how to line porous ones, with the safety points spelled out in detail. If you are planning a patio or balcony of containers, the raised bed planner tool helps you work out how much growing space and compost you will actually need.
Food-safe is the only rule that is non-negotiable
For anything you will eat, the test is simple: if you cannot be sure what a container or piece of timber previously held or was treated with, do not use it for edibles. When in doubt, grow flowers in it instead.
DIY projects from junk
Beyond pots and planters, a lot of everyday garden kit can be built from materials most people throw away — and building it yourself is half the fun.
Plastic milk bottles become mini cloches (cut off the base, pop over a seedling) and slow-drip waterers (pierce the cap, sink it neck-down beside a thirsty plant). Old CDs, foil trays and strips of plastic strung on canes make bird-scarers. Wooden pallets — heat-treated only — turn into compost bays, vertical herb planters, potting benches and rough raised beds. Bamboo canes, prunings and hazel stems make plant supports and wigwams for beans and peas without a trip to the shop. Bricks, broken slabs and offcuts of wood become bed edging and path materials.
A few of these are genuinely worth the half-hour: a cardboard-and-compost no-dig bed laid straight onto grass, a milk-bottle dripper for holiday watering, a pallet compost bay. Our DIY garden projects guide collects the ones that actually work and walks through building them, so you are not just hoarding junk in the hope of a use.
If you keep hens, the loop closes even further — their bedding and manure feed the compost heap, and the garden's surplus feeds them. See chickens and your vegetable garden for how to run the two together. And leaving a few "untidy" corners — a log pile, a patch of nettles, a heap of prunings — quietly builds a wildlife-friendly garden full of the frogs, beetles and birds that keep pests down for you.
Homemade liquid feeds, and an honest word on eggshells and coffee grounds
This is the section where thrifty gardening collides hardest with folklore, so let us be plain about what works and what does not.
What genuinely works are homemade liquid feeds brewed from plants:
- Comfrey tea — comfrey leaves steeped in water (or rotted in a covered container) make a potassium-rich feed that is excellent for fruiting crops like tomatoes, courgettes and strawberries. Grow a clump of the 'Bocking 14' variety, which does not set seed and spread.
- Nettle tea — young nettles steeped the same way give a nitrogen-rich feed good for leafy growth early in the season.
- Worm liquid and bokashi liquid — if you run a wormery or bokashi bin, both produce a concentrated liquid feed as a by-product. Dilute well before use.
These are real fertilisers: they contain the nutrients in a form plants can take up, and they cost nothing once the plants or systems are established. The how-to — ratios, steeping times, how much to dilute (both comfrey and nettle teas are smelly and need diluting roughly ten to one) — is in our homemade plant feeds guide.
Now the myths, because believing them wastes effort and sometimes causes harm:
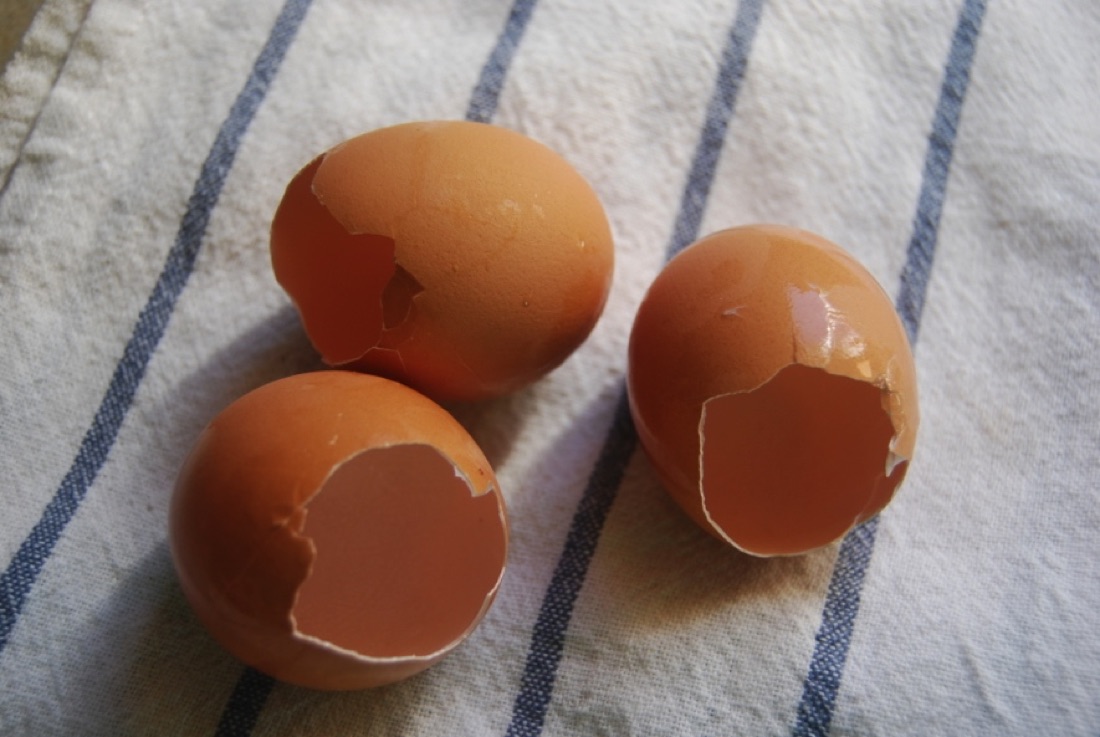
- Crushed eggshells are not a quick fertiliser. Eggshells are mostly calcium carbonate, and they break down in soil extremely slowly — over years, not weeks. Scattering them around a plant does almost nothing for that season's growth. They are fine added to the compost heap (crushed small), but treat them as a very slow soil-conditioner at best, not a feed.
- Eggshell slug barriers are largely ineffective. The idea that a ring of crushed shell stops slugs has been tested and does not hold up — slugs cross them quite happily. If slugs are your problem, the methods that actually work are different ones entirely.
- Eggshells do not cure blossom end rot. This is the big one. Blossom end rot — the sunken black patch on the bottom of tomatoes, peppers and courgettes — is a calcium-uptake problem, almost always caused by irregular watering, not by a lack of calcium in the soil. Crushing eggshells into the planting hole will not fix it because the calcium is neither available fast enough nor the actual issue. The fix is consistent, even watering. See our dedicated guide to blossom end rot for the real cause and cure.
- Coffee grounds and banana skins are best composted, not used as miracle feeds. Both are perfectly good compost ingredients — coffee grounds count as a "green", banana skins rot down readily. But sprinkling them neat around plants is overrated: fresh grounds can mat and even mildly suppress growth in quantity, and a buried banana skin releases its modest nutrients far too slowly to act as a feed. Put them on the heap and let the compost do the work.
Our full eggshells in the garden guide goes through these claims one by one with the evidence, so you can stop doing the things that do not work and put the effort where it pays.
The honest rule of thumb
If a thrifty "hack" sounds like a miracle — a single household item that feeds plants, stops pests and cures disease — it almost certainly is not one. The things that genuinely work are unglamorous: compost, leaf mould, plant teas and consistent watering.
Free plants
The plants themselves can be free, too. Once you stop buying seedlings and seed every year, the cost of growing your own drops close to zero.
Saving seed. Many crops let you save seed from your best plants to sow next year. The easiest to start with are open-pollinated (not F1 hybrid) tomatoes, beans, peas and lettuce — let a few pods or fruits fully ripen, dry the seed, and store it cool and dark in a labelled paper envelope. Beans and peas in particular are almost foolproof: just leave some pods to dry on the plant. Avoid saving seed from F1 hybrids, which do not come true.
Taking cuttings. Soft fruit and many herbs root easily from cuttings. Tip cuttings of mint, rosemary or sage in summer, and hardwood cuttings of currants and gooseberries in autumn, turn one plant into several for nothing.
Dividing. Clump-forming perennials — rhubarb, chives, mint, strawberries (via their runners) — can be lifted and split to make more plants. Strawberry runners are the classic free-plant machine: peg a runner down into a pot of compost, let it root, then snip it free.
Seed swaps and sharing. Local "seedy Saturday" swap events, allotment association swaps, community gardens and online groups are full of gardeners with surplus seed, spare seedlings and divisions to give away. Most growers end up with far more seed than they can use, so swapping is the norm, not a favour. It is also how you find varieties that thrive locally.
If you do need to buy seed for a particular crop, buy once and save thereafter. When you are starting a plot from scratch, our start a vegetable garden guide and the wider getting started hub walk through planning it all out.
A safety note
Most of what is in this guide is as safe as it is thrifty, but reusing materials does carry a few specific risks worth gathering in one place — because you are growing food.
- Food-safe containers only. Never grow edibles in anything that held chemicals, oils, fuel, solvents or paint. Residues can persist and contaminate crops.
- Avoid old tyres for food crops. Because of the unresolved leaching question, keep tyres for ornamentals and use safe containers for anything you will eat.
- Heat-treated (HT) timber and pallets only. Avoid chemically-treated wood, old creosoted sleepers and pallets stamped "MB" — all can leach into soil. HT-stamped pallets are fine.
- Keep the wrong things out of the open compost heap. No cooked food, meat, fish or dairy in an ordinary heap — those go to bokashi, a hot bin, or council food recycling to avoid attracting vermin.
- Mind where your free materials grew. Be a little cautious with grass clippings, hay or manure from unknown sources, which can occasionally carry persistent weedkiller residues that damage crops. If in doubt, compost a small batch and do a test before spreading it widely.
None of this should put you off — it is a short checklist, and once it is second nature you can reuse with confidence.
A few cheap basics worth buying
The whole point of this guide is to spend as little as possible, so this list is deliberately short. There are a handful of inexpensive items that genuinely earn their place — they do jobs that household waste cannot, and a good one lasts years.
That really is most of it. A trowel, a watering can and a pair of secateurs you may already own, and almost everything else in this guide costs nothing.
Where to go next
Reusing and recycling is less a single technique than a way of running a garden — a habit of looking at "waste" and seeing a resource. Start with whichever piece fits your situation: make a heap if you have space, raise seedlings in your recycling, or brew a bucket of comfrey feed. Each detailed guide below picks up where this one leaves off.
- How to make compost — the foundation of free gardening
- DIY seed pots — pots from your recycling bin
- Upcycled containers — grow food in free containers, safely
- DIY garden projects — useful kit from junk
- Homemade plant feeds — feeds that genuinely work
- Eggshells in the garden — the honest verdict on a popular myth
Garden thriftily and you will find the savings add up, the waste goes down, and the whole thing feels a little more like a system you run rather than a shop you keep visiting.
Key terms in this guide
- Compost
- — Decomposed organic matter — kitchen and garden waste broken down into a dark, crumbly, sweet-smelling material that feeds soil and plants.
- No-dig gardening
- — A way of gardening that avoids digging the soil. Instead you spread compost on the surface and let worms and weather work it in, protecting soil structure and suppressing weeds.
Useful tools for this
Frequently asked questions
How can I garden cheaply?
Is it safe to grow food in recycled containers?
Keep reading
Using Eggshells in the Garden: Do They Actually Work?
Do eggshells work in the garden? An honest UK look at eggshells as fertiliser, slug barriers and seed pots — what helps, what's a myth, and the best use.
DIY Seed Pots from Household Waste
Make free seed pots and modules from household waste in the UK — toilet roll tubes, newspaper pots, egg boxes and more, plus which crops suit each.
Upcycled Containers for Growing Food
Grow food in upcycled containers in the UK — buckets, crates, tins and old sinks — plus the safety checks for which recycled containers are food-safe.