🌱 Getting Started
How to Set Up a Homestead Patch (UK Guide)
A complete UK guide to setting up a homestead patch from scratch — planning the plot, what to include, where to get materials, and a realistic first-year path.
Some links on this page are affiliate links. If you buy through them we may earn a small commission, at no extra cost to you. We only recommend things we think are genuinely useful for home growers.
A "homestead" can sound like a far-off dream of acres, livestock and total self-sufficiency. In reality, for most of us in the UK, a homestead patch is something far more achievable: a productive corner of a back garden or an allotment that quietly feeds you through much of the year. This guide is the hub for setting one up from scratch — what it actually is, how to plan it around your space, what to include, where to get the materials, and a realistic path through your first year.
You don't need to do it all at once, and you certainly don't need to spend a fortune. The aim here is to give you the whole picture so you can start small, build steadily, and end up with a patch that earns its keep.
Start where you are
A few raised beds, a compost bay, some herbs and a water butt will produce real food in your first season. Everything else can be added year by year. Resist the urge to build it all in one heroic weekend.
What a homestead patch actually is
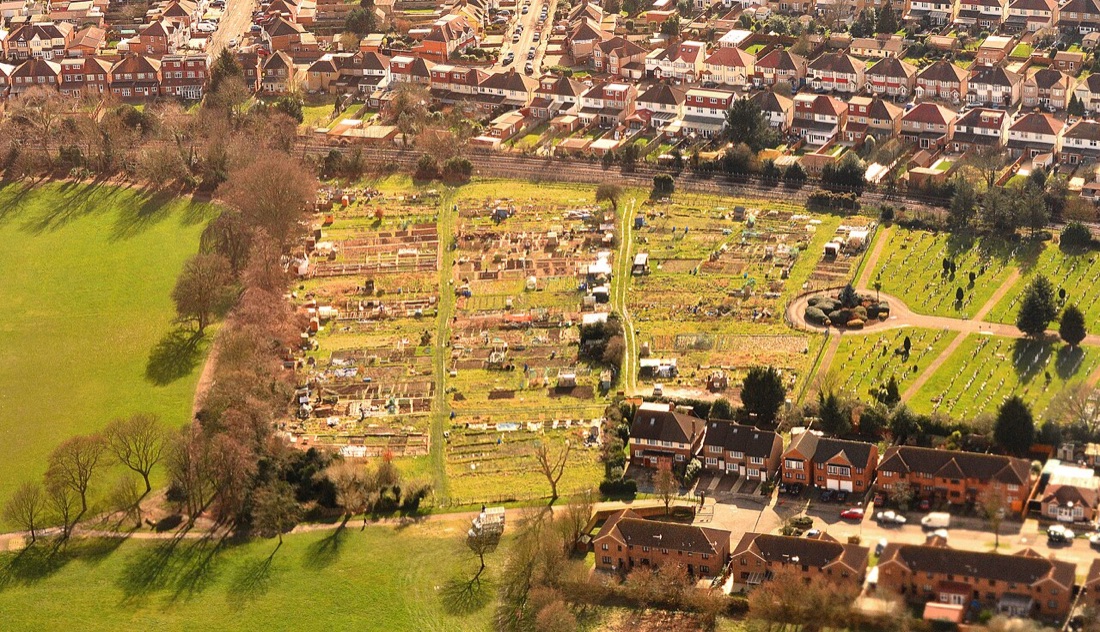
Forget the off-grid smallholding for a moment. A homestead patch, in the sense we mean it, is simply a home growing space set up to produce a meaningful share of your own food — scaled to whatever you've got. That might be a 6m by 4m corner of the lawn, a back garden given over to beds and a couple of fruit trees, or a full allotment plot.
What makes it a homestead patch rather than just a veg bed is that it's designed as a small, joined-up system. The compost feeds the soil, the soil feeds the veg, kitchen and garden waste feed the compost, the water butt waters it all, and — if you like — a few chickens turn scraps into eggs and manure. Each part supports the others, so the whole becomes more productive and less wasteful over time.
You decide the ambition. Some people want a patch that covers most of their summer veg and a glut to store; others are happy with salads, herbs, soft fruit and a few favourites, buying the rest. Both are valid. A productive patch in a normal British garden is the goal — not self-sufficiency on day one.
If you're completely new to growing, it's worth reading how to start a vegetable garden alongside this guide. This page is the wide-angle view; that one zooms in on the growing itself.
Assess your space and goals first
Before you buy a single thing, spend an hour really looking at your space. The most common, most expensive mistake is building beds in the wrong place. Five things decide what your patch can do.
Sun. Most vegetables and fruit want six or more hours of direct sun a day in the growing season. Watch where the sun falls across your plot through the day — morning sun, midday, and where the shadows from fences, sheds and trees land. The sunniest spot goes to your main veg beds and any fruit; shady corners can still grow leafy greens, herbs like mint, currants and a compost area.
Size. Be honest about how much you can plant and keep on top of. An overgrown, weed-choked plot is dispiriting; a small, well-tended one is a joy. It's far better to start with two or three beds you can manage than to dig up the whole lawn and lose heart by July. Our guide on how much to grow helps you match bed area to what your household will actually eat.
Soil. Dig a small hole and have a look. Is it heavy clay that stays wet, free-draining sand, or somewhere in between? Squeeze a handful — clay holds together in a sticky ball, sand falls apart. You don't need perfect soil to start, because we'll build it up with organic matter, but knowing what you've got shapes your approach. (Raised beds and a no-dig method, both covered below, sidestep poor soil very effectively.)
Water. Where's your nearest tap or downpipe? You'll be carrying or piping a lot of water in a dry spell, so siting beds within easy reach of a water butt or hose saves endless effort.
Time and budget. A homestead patch is a hobby that gives back, not a second job. Reckon honestly on how many hours a week you'll really give it — and how much you can spend. Both can be modest. The rest of this guide assumes you want good results without breaking either.
Once you've taken stock, sketch a rough layout. We've a whole guide on this — see planning a homestead layout for working out where beds, paths, compost, water and any chickens should sit, plus how to use the raised bed planner to size it all up.
Renting? Check first
If you rent your home or take on an allotment, check what you're allowed to do before building anything permanent. Most allotment sites have rules on structures, sheds, trees and livestock, and many landlords are fine with raised beds but not with you removing a lawn wholesale.
The building blocks of a homestead patch
Here's the heart of it. A well-rounded homestead patch is made of a handful of elements, each of which you can add in its own time. You don't need all of them in year one — but knowing the full kit helps you plan the layout so nothing has to be torn up later.
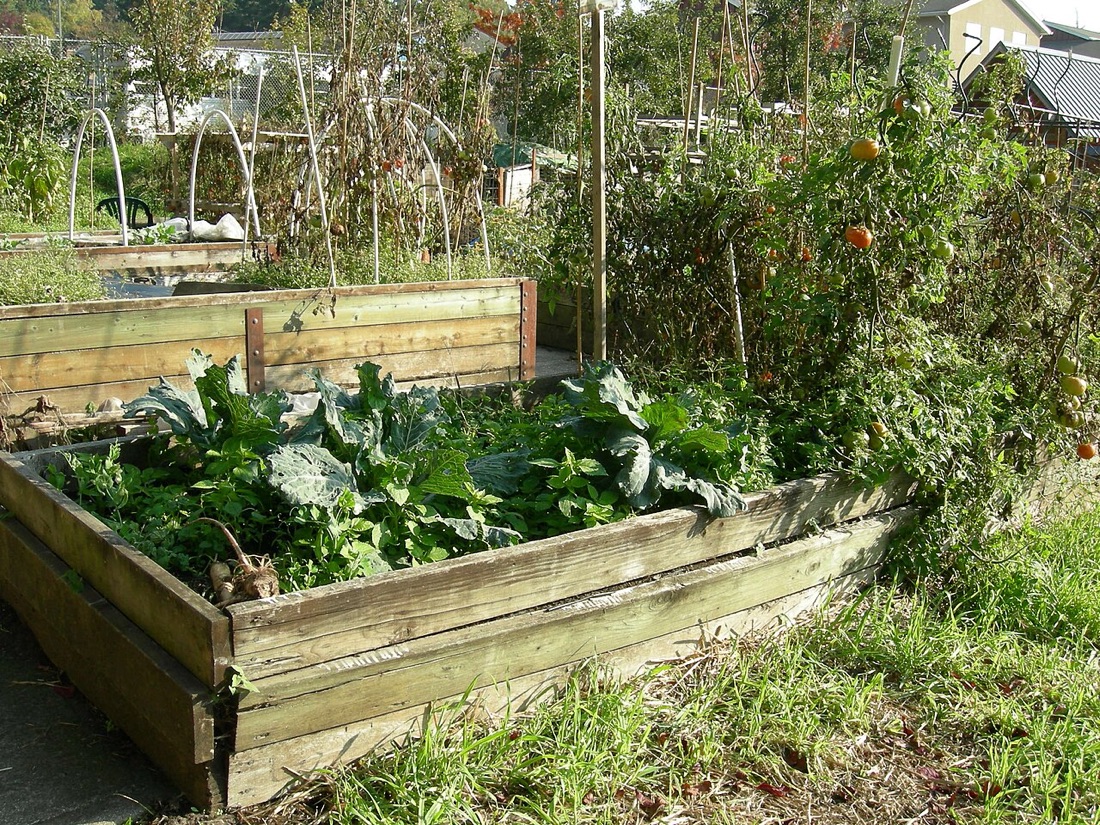
Vegetable beds — the engine room
Vegetables are where a homestead patch earns its keep fastest. A few well-made beds will out-produce a much larger, poorly tended area. For most people, raised beds are the easiest, tidiest and most productive way to start: they warm up earlier in spring, drain better, define your paths, and let you fill them with good soil regardless of what's underneath.
Start by reading how to start a vegetable garden for the growing basics, then building raised beds for the practical how-to — sizes, timber, and filling them cheaply. A bed around 1.2m wide lets you reach the middle from either side without treading on the soil, which is the whole point. Three or four beds is a sensible first-year target for a garden; a half-plot of beds for an allotment.
If you're tight on ground or growing on hard standing, you can do a surprising amount in containers and pots too — potatoes in sacks, salads in troughs, tomatoes in grow bags.
Fruit — plant it once, pick it for years
Fruit is the best-value thing on a homestead: you plant it once and harvest for a decade or more. Soft fruit crops fastest — strawberries will fruit in their first summer from runners, and currants, gooseberries and raspberries reward you within a year or two for very little work.
If you've room, a fruit tree or two is a long-term gift to the patch. Modern apples on dwarfing rootstocks stay small enough for a normal garden and even thrive trained against a sunny fence. Plant them in autumn or winter while dormant, and they'll be cropping by the time the rest of your homestead has hit its stride.
Herbs — small space, big return
Herbs are the easiest win of all, and the patch element that most changes how you cook. A sunny corner or a few pots by the back door is enough. Hardy perennials like rosemary, thyme, sage and chives come back every year and ask almost nothing of you — see growing Mediterranean herbs for these sun-lovers, and add some basil on a warm windowsill for summer. A herb patch costs little to set up and pays you back every single meal.
A compost system — the beating heart
If there's one thing that turns a collection of beds into a homestead, it's compost. A compost system takes your kitchen scraps, weeds, grass clippings and autumn leaves and turns them into free, dark, crumbly soil food — closing the loop and cutting what you buy in.
Learn how to make compost and set up at least one bay or bin early; two or three side by side is better still, so one can rot down while you fill another. Don't overlook leaf mould either — autumn leaves, gathered for free and left to rot for a year, make a superb soil conditioner and seed compost. Site your compost somewhere shady and accessible, ideally near the kitchen path so you'll actually use it in the rain.
Water collection — catch what falls
Water is free if you catch it. A water butt on every downpipe — house, shed, greenhouse — stores rainwater for nothing and means you're not paying for metered tap water all summer, nor caught out by a hosepipe ban. Rainwater is also better for the plants. Our guide to water on the homestead covers butts, linking them together, simple irrigation and getting through a dry spell. Plan where your butts go early, because beds are easiest to water when they're close to the store.
Chickens — eggs, manure and entertainment
A few hens are the classic next step, and they fit a homestead beautifully: they eat your kitchen scraps and surplus crops, lay eggs, and produce nitrogen-rich manure that — once composted — feeds your beds. Three or four hens suit most gardens and lay plenty of eggs for a household.
They're a commitment, though: daily care, secure housing against foxes, and somewhere they can't wreck your veg. Read keeping chickens for beginners before you take the plunge, and chickens and your vegetable garden for keeping the two working together rather than at war. Chickens are very much an optional extra — your patch is a homestead with or without them.
Wildlife — your unpaid workforce
The final building block is the easiest to overlook: wildlife. Bees and hoverflies pollinate your beans, courgettes and fruit; ladybirds, frogs and birds eat the aphids and slugs that would otherwise eat your crops. A patch that welcomes them needs far less intervention.
You don't have to do much — a few flowers among the veg, a log pile, a patch left a little wild, and ideally a small wildlife pond. See making a wildlife-friendly garden for simple additions that turn nature into your pest-control department. It pairs naturally with organic, no-spray growing, which most homesteaders end up doing once the wildlife arrives.
Building healthy soil from the start
Everything above stands or falls on one thing: your soil. Good soil is the single biggest factor in whether your homestead thrives, and the good news is you can build it cheaply, mostly with things you'd otherwise throw away.
The modern, low-effort approach is no-dig gardening. Instead of digging and turning the soil every year, you leave it undisturbed and add organic matter on top as a mulch; the worms pull it down and do the work for you. The result is less effort, fewer weeds and a beautiful, crumbly tilth — and it's ideal for raised beds. Read no-dig gardening for the full method, and improving your soil for the wider picture of feeding it over time.
The fuel for all of this is organic matter — compost and well-rotted manure. Your own compost bay (above) makes some; for the rest, well-rotted horse or farmyard manure is the homesteader's best friend, often free or nearly so from local stables. Our guide on sourcing manure and compost shows where to find it, how to tell when it's properly rotted, and how much you need. A 5–8cm layer of compost spread over your beds each year, no-dig style, is genuinely most of soil care done.
Watch out for contaminated manure
A small number of agricultural weedkillers (aminopyralids) can survive in manure and hay and wreck tomatoes, potatoes, beans and other crops. Ask the stable what their horses are fed and whether the fields are sprayed, and if in doubt, compost a sample and grow a few broad bean seeds in it as a test before spreading it on your beds.
Where to get the materials
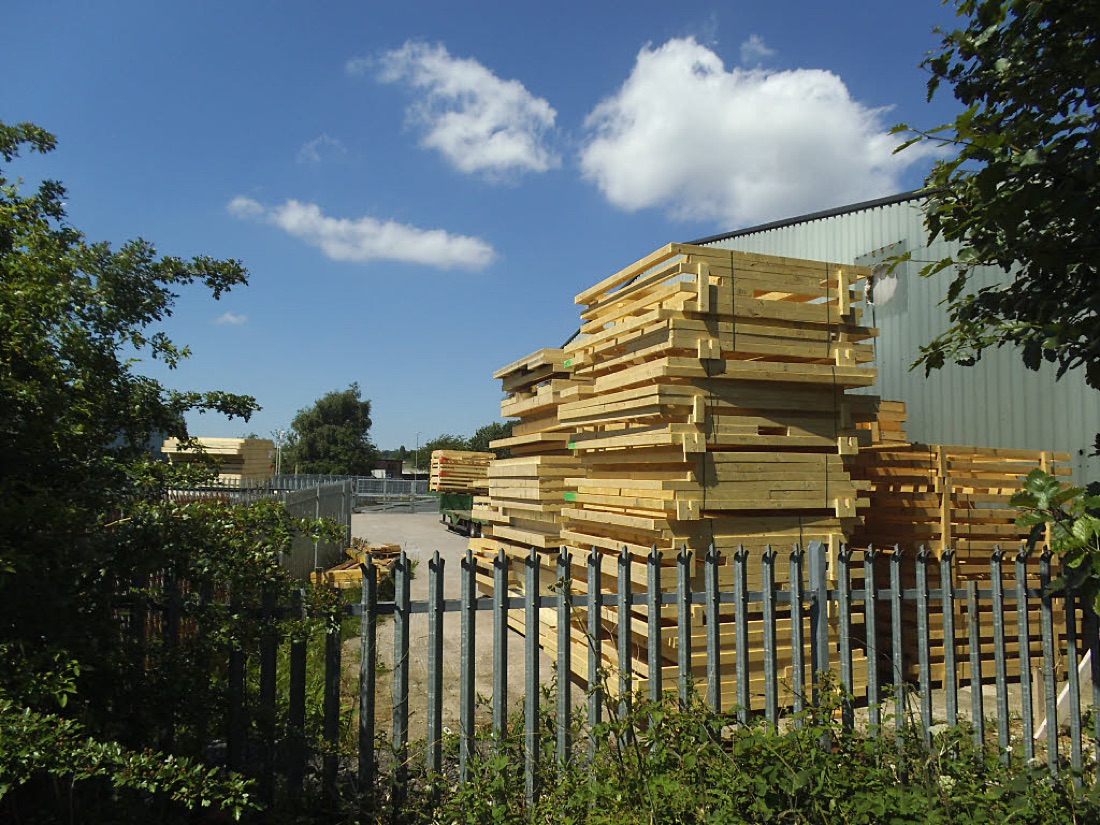
A surprising amount of a homestead can be built from free, salvaged or cheap materials if you know where to look. Timber for beds, woodchip for paths, manure, pots, even sheds and water butts can often be had for nothing or next to nothing — it just takes a bit of legwork.
This is a topic in its own right, so we've a dedicated guide: where to get garden materials walks through Freecycle and Freegle, Facebook groups, local stables, tree surgeons (for free woodchip and logs), builders' merchants, and your council's green-waste and subsidised compost schemes. Pair it with reuse and recycle in the garden and upcycled containers for ideas on turning what you've already got into something useful. The general rule: source the bulky, cheap stuff locally and free where you can, and save your money for the few tools that need to be reliable.
Planning what to grow and rotating it
With your beds built and soil improving, the fun part: deciding what fills them. The instinct is to grow one of everything; the wiser path is to grow a good amount of the things you actually eat, plus a couple of crops just for the joy of it.
A year-round plan stops you from a feast-and-famine garden. Our grow-your-own year plan and gardening month by month map out what to sow across the seasons, so something's always coming on. If you're brand new, lean on the easiest crops for beginners for your first season — courgettes, beans, salad leaves, potatoes and tomatoes are forgiving and productive — and add trickier crops once you've found your feet.
Once you've several beds, bring in crop rotation: grouping crops by family and moving them around each year to keep the soil balanced and break pest and disease cycles. It sounds fiddly but it's mostly common sense, and the crop rotation planner does the thinking for you. For timing, the planting calendar gives you UK sowing and harvesting dates so nothing goes in too early in a cold spring — and remember, in a late, cold British spring it always pays to wait an extra fortnight rather than lose tender plants to a frost.
A simple first-year rhythm
Winter: plan, build beds, spread compost. Early spring: sow indoors, plant fruit. Late spring: plant out after the frosts. Summer: water, weed, harvest. Autumn: gather leaves, manure the beds, plant trees. The patch never really stops, but it's never overwhelming if you work with the seasons.
A realistic first year — and how to phase it
The single biggest favour you can do yourself is to phase the build over time rather than attempting everything at once. A homestead is built in layers, and trying to do it all in one season is the fastest route to burnout and a half-finished plot.
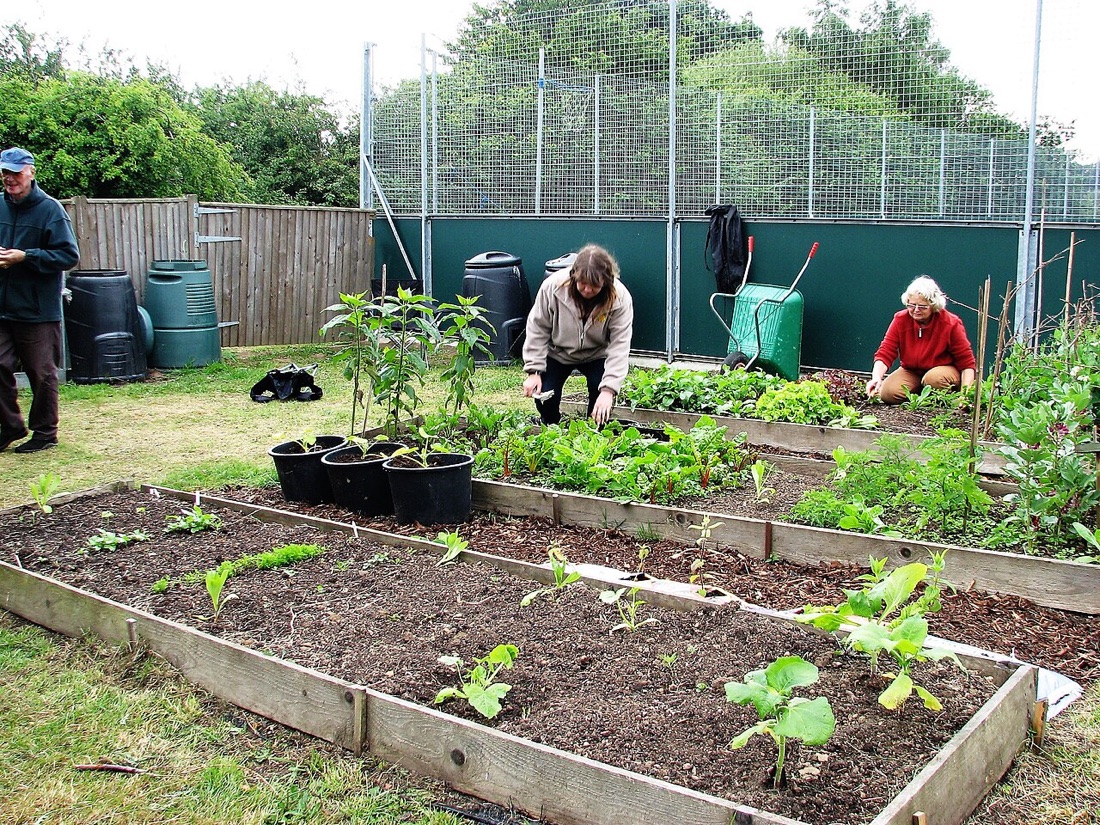
A sensible first year looks something like this: build two or three beds, fill them with sourced soil and compost, set up one compost bay, fit a water butt, plant some herbs and strawberries, and grow a handful of easy crops while you learn your garden. That alone is a real, working homestead patch — and a satisfying first year.
Year two you might add more beds, a fruit tree or two, a second compost bin and a greenhouse or cold frame. Year three, perhaps, the chickens and the wildlife pond. Spreading it out spreads the cost, you learn as you go, and each addition slots into a plot you already understand. For a month-by-month walk-through of that first year, follow our first-year homestead plan, which turns all of the above into a do-this-now schedule.
The golden rule of phasing
Add one new element per season, get it working, then add the next. A patch built steadily over three years is robust and well understood; a patch built in one frantic spring is usually a mess by autumn.
Doing it affordably
None of this needs deep pockets. The most expensive-looking homesteads are usually the ones built slowly from reclaimed materials and home-made compost — the cost is just spread thin and hidden in the effort. A few principles keep it cheap:
- Build the soil for free. Home compost, leaf mould, sourced manure and council green-waste compost replace most of what you'd otherwise buy.
- Reclaim your hard materials. Scaffold boards, pallets and old timber make excellent beds; tree-surgeon woodchip makes free paths. See reuse and recycle in the garden.
- Grow from seed, not plants. A £2 packet of seeds gives dozens of plants; plug plants cost many times more.
- Save your own seed and take cuttings. Strawberries from runners, herbs from cuttings, and saved beans and tomatoes cost nothing.
- Buy few things, but buy them well. A handful of good tools you'll use for years are worth paying for; almost everything else can be sourced or improvised.
For the full money-saving playbook — including a rough budget for setting up a patch from scratch — see homesteading on a budget. Plenty of people set up a genuinely productive patch for under a hundred pounds by being patient and resourceful.
What you'll need to get started
Most of a homestead can be sourced free or cheaply, but a few genuinely useful basics make the early jobs easier. Buy these well — a decent trowel and a quality watering can last decades — and improvise the rest. (We cover the full kit in best tools for beginners and bed options in best raised bed kits.)
For choosing what to sow first, our pick of reliable, beginner-friendly varieties is a good place to start:
Ready to grow easy beginner vegetables?
We recommend the Courgette, runner bean, beetroot & salad leaves variety to start with. Grab a packet and get sowing.
Where to go next
You now have the full picture of a homestead patch — what it is, how to plan it, what to build, and how to do it without overspending or overreaching. The next steps depend on where you are. To plan the plot itself, go to planning a homestead layout. To gather your materials cheaply, head to where to get garden materials. And when you're ready to actually start, follow the first-year homestead plan month by month.
Whatever the size of your patch, the principle is the same: start small, build the soil, add one piece at a time, and let the seasons set the pace. A productive homestead is built not in a weekend but over a few quiet, satisfying years — and you can plant the first bit this season.
Key terms in this guide
- No-dig gardening
- — A way of gardening that avoids digging the soil. Instead you spread compost on the surface and let worms and weather work it in, protecting soil structure and suppressing weeds.
- Compost
- — Decomposed organic matter — kitchen and garden waste broken down into a dark, crumbly, sweet-smelling material that feeds soil and plants.
Useful tools for this
Frequently asked questions
What is a homestead patch?
How much space do you need for a homestead?
How do I start a homestead on a budget?
Keep reading
Where to Get Garden Materials (Cheap and Free)
Where to get garden and homestead materials in the UK — timber, compost, manure, woodchip and tools — cheaply or free, from councils, stables, Freecycle and more.
Planning a Homestead Layout
How to plan a homestead layout in the UK — zoning beds, paths, fruit, compost, water and chickens around sun, access and your daily routes for an efficient patch.
A First-Year Homestead Plan
A realistic first-year plan for setting up a UK homestead — what to tackle each season, what to leave for year two, and how to avoid taking on too much.